> ## Documentation Index
> Fetch the complete documentation index at: https://ampersand-24eb5c1a-mintlify-9a8a4289.mintlify.site/llms.txt
> Use this file to discover all available pages before exploring further.
# Salesforce
This guide helps you set up your Salesforce org to work with an Ampersand-powered integration. The steps differ depending on whether the integration uses an **External Client App** or a **Connected App**. If you're not sure which one you're using, ask the developer who built the integration.
## Checklist before installing
Complete these checks before you install or connect the integration. If any of them fail, the connection will not work.
### 1. Confirm your edition has API access
Your Salesforce edition must include API access. Without it, the integration cannot connect.
Check [Salesforce's API access by edition](https://help.salesforce.com/s/articleView?language=en_US\&id=000385436\&type=1). If your edition does not include API access, contact your Salesforce account representative to upgrade.
### 2. Know which app type you're installing
Ask the developer whether this integration uses an **External Client App** or a **Connected App**. Use the matching tab in the sections below.
### Glossary
* **License** — Purchased from Salesforce; sets the maximum permissions a user can receive. Which license you need depends on who connects — see [Choose credentials and grant access](#choose-credentials-and-grant-access).
* **Profile** — Controls object, field, and feature access. Each user has exactly one profile (standard or custom), tied to one license. System Administrator is a profile, not a license.
* **Permission set** — Extra permissions assigned on top of a profile. Users can have multiple permission sets; each set is tied to a license.
## Setting up the integration
### Install the package
The developer will provide a **package install URL**. Complete this install **before** connecting Salesforce in the integration UI, or OAuth will fail.
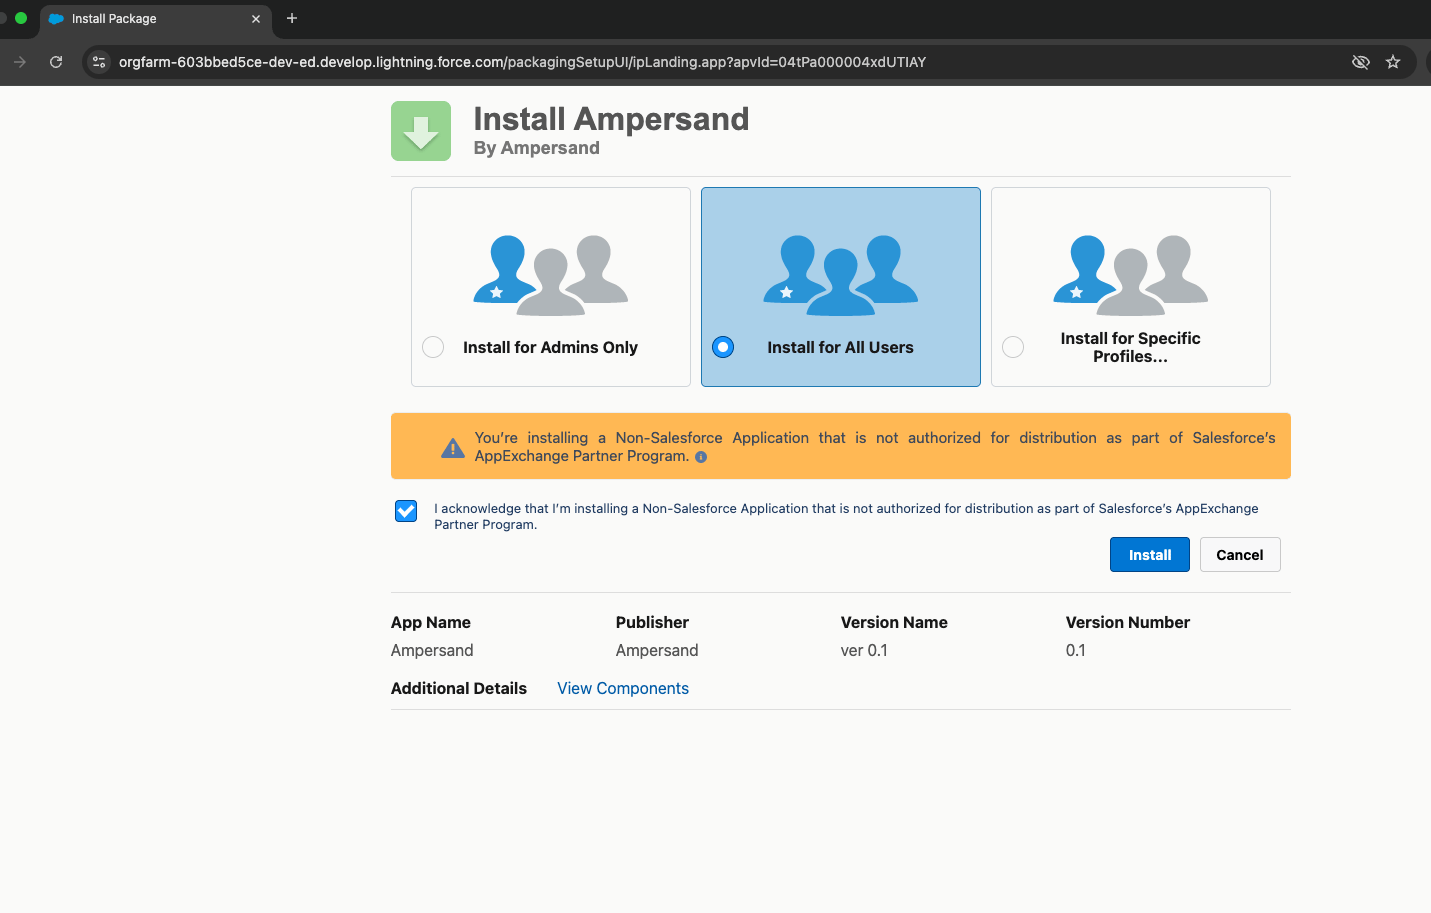
1. Open the package install URL provided by the developer.
2. Log in to your Salesforce org if prompted.
3. Select **Install for All Users**.
4. Check the acknowledgment checkbox.
5. Click **Install**.
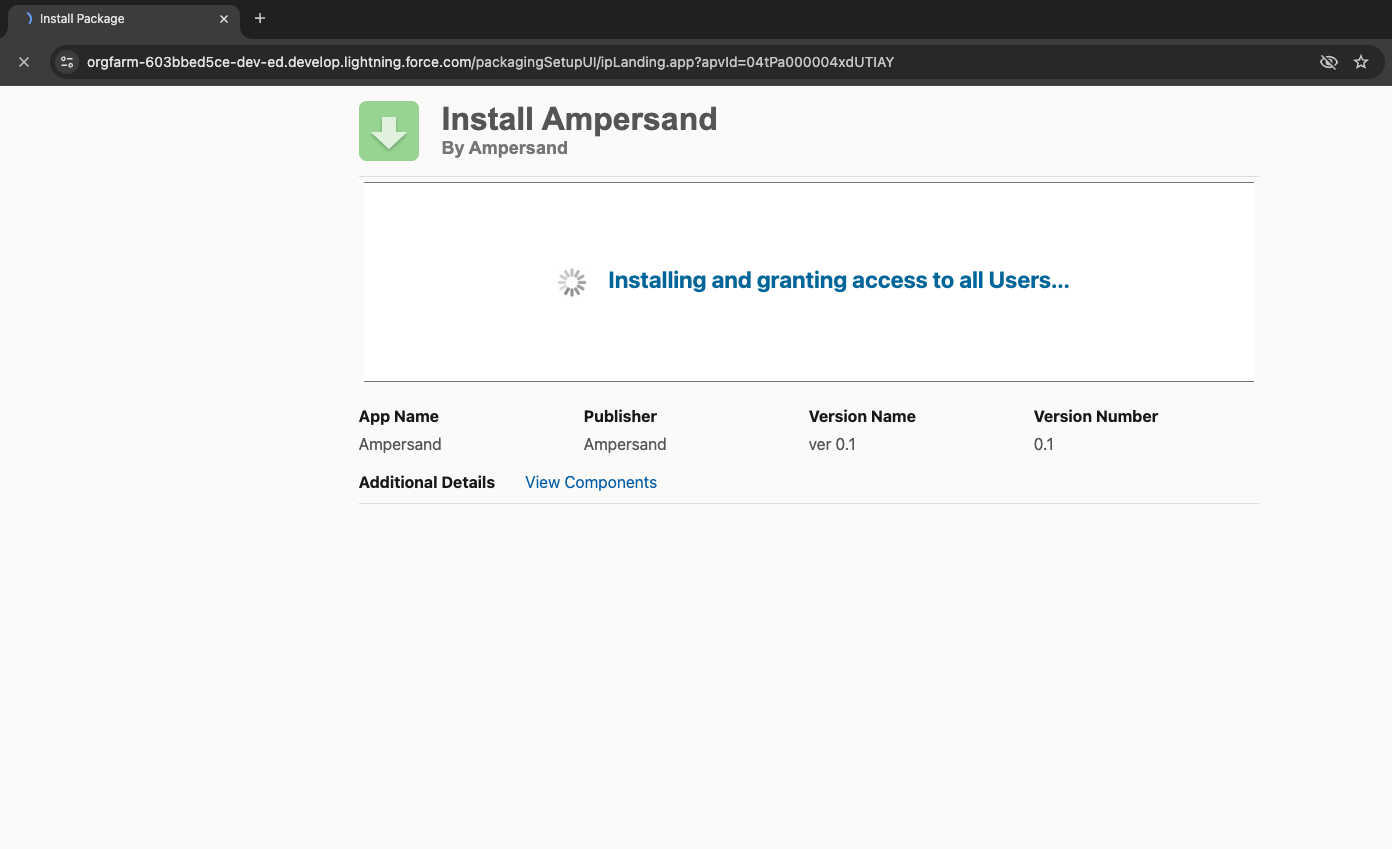
 You will see a progress screen while the installation completes.
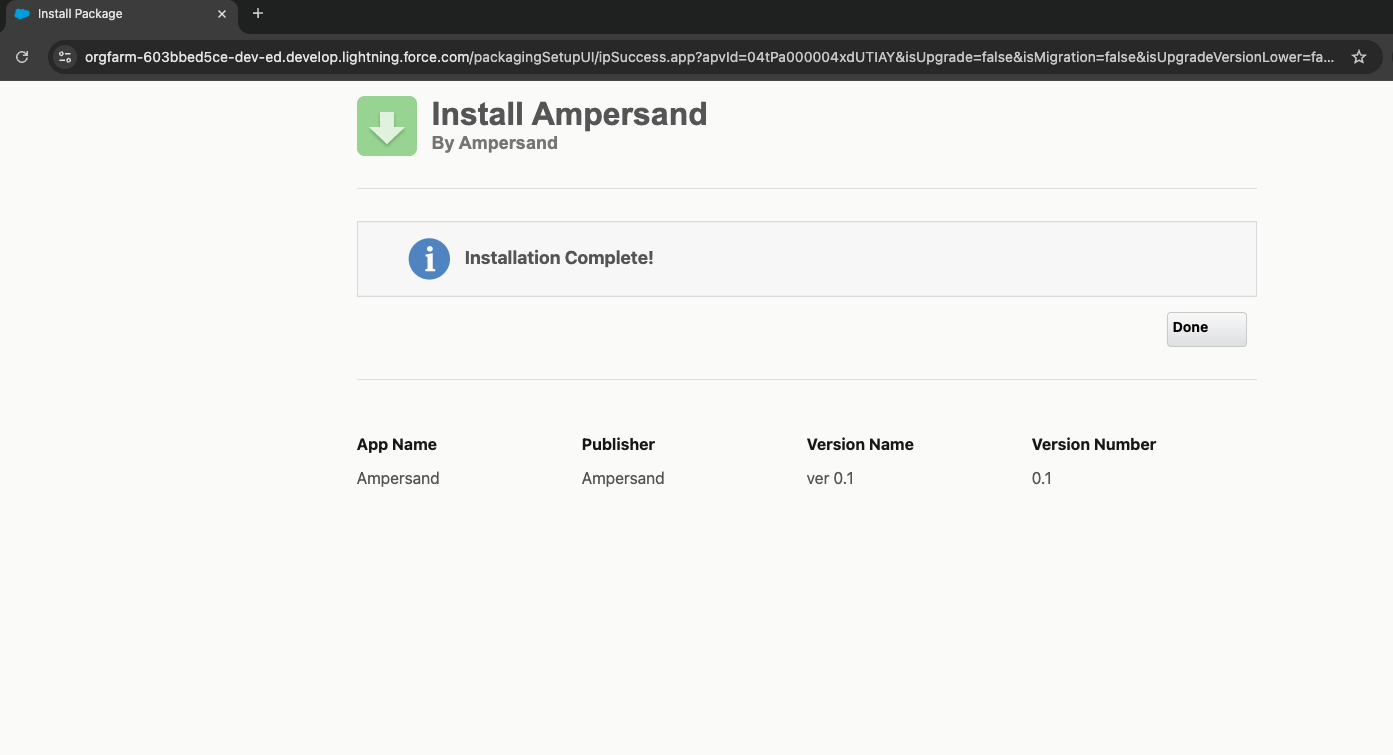
 Once complete, you should see a confirmation screen:
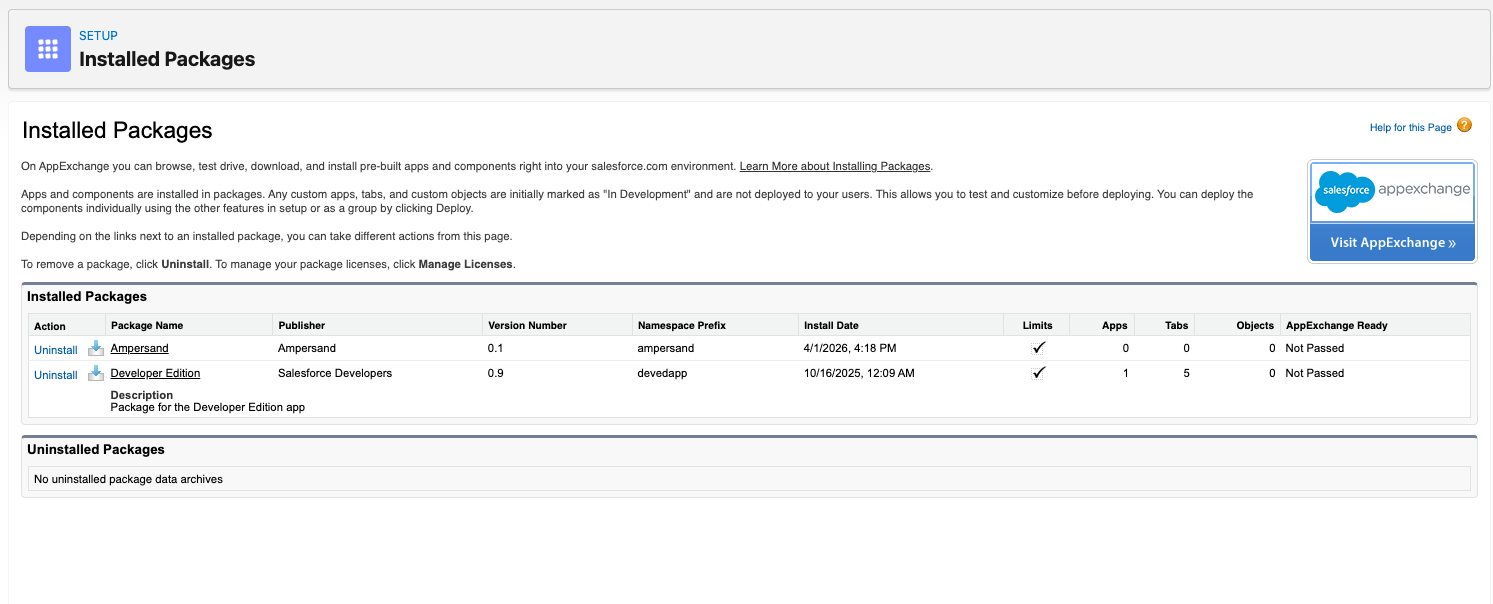
 To verify, go to **Setup**, search for **Installed Packages**, and confirm the package appears in the list.
 ### Configure token policy settings
Set the refresh token policy so the integration stays connected after access tokens expire.
1. Log in to **Salesforce**.
2. Go to **Setup**.
3. In the **Quick Find** box, search for **Connected Apps**.
4. Click **Manage Connected Apps**.
5. Find and click the name of the application you are integrating with.
6. Scroll to **OAuth Policies**.
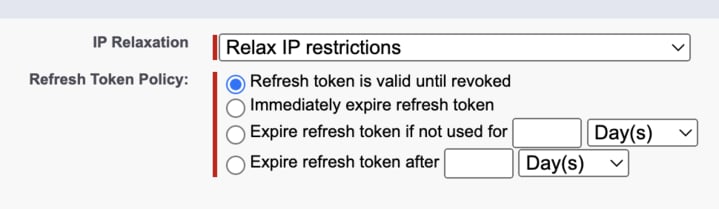
7. Under **IP Relaxation**, select **Relax IP restrictions**.
8. Set **Refresh Token Policy** to **Refresh token is valid until revoked**.
### Configure token policy settings
Set the refresh token policy so the integration stays connected after access tokens expire.
1. Log in to **Salesforce**.
2. Go to **Setup**.
3. In the **Quick Find** box, search for **Connected Apps**.
4. Click **Manage Connected Apps**.
5. Find and click the name of the application you are integrating with.
6. Scroll to **OAuth Policies**.
7. Under **IP Relaxation**, select **Relax IP restrictions**.
8. Set **Refresh Token Policy** to **Refresh token is valid until revoked**.
 9. Click **Save**.
After you connect the app, also confirm **Permitted Users** under app policies. See [After installing the integration](#after-installing-the-integration).
## Choose credentials and grant access
Pick one way to connect, then grant the permissions below.
**Required system permissions** (enable these on the profile or permission set you configure):
* **API Enabled**
* If the integration includes real-time Subscribe Actions, also enable the [Subscribe Action permissions](#subscribe-action-permissions)
* For Connected Apps only, also enable one of:
* **Use Any API Client** (shown if your org has [API Access Control](https://help.salesforce.com/s/articleView?id=xcloud.security_api_access_control_about.htm\&type=5) enabled)
* **Approve Uninstalled Connected Apps** (if you do not see **Use Any API Client**)
### Option A: Human user
Use one of the following:
* **System Administrator** — Already on a supported license (System Administrator is a profile on the **Salesforce** license). You still need to grant the correct object and field permissions; they are not always included by default.
* **Sales team member or other human user** — Must have the **Salesforce** User License. The **Salesforce Platform** User License is insufficient. This user can have a standard profile (such as **Standard User**) or a custom profile.
#### 1. Configure system permissions
In **Setup**, search for **Profiles** in the **Quick Find** box and open it. Then:
1. Select the profile you'd like to view and edit.
2. Click **Edit** at the top of the page.
9. Click **Save**.
After you connect the app, also confirm **Permitted Users** under app policies. See [After installing the integration](#after-installing-the-integration).
## Choose credentials and grant access
Pick one way to connect, then grant the permissions below.
**Required system permissions** (enable these on the profile or permission set you configure):
* **API Enabled**
* If the integration includes real-time Subscribe Actions, also enable the [Subscribe Action permissions](#subscribe-action-permissions)
* For Connected Apps only, also enable one of:
* **Use Any API Client** (shown if your org has [API Access Control](https://help.salesforce.com/s/articleView?id=xcloud.security_api_access_control_about.htm\&type=5) enabled)
* **Approve Uninstalled Connected Apps** (if you do not see **Use Any API Client**)
### Option A: Human user
Use one of the following:
* **System Administrator** — Already on a supported license (System Administrator is a profile on the **Salesforce** license). You still need to grant the correct object and field permissions; they are not always included by default.
* **Sales team member or other human user** — Must have the **Salesforce** User License. The **Salesforce Platform** User License is insufficient. This user can have a standard profile (such as **Standard User**) or a custom profile.
#### 1. Configure system permissions
In **Setup**, search for **Profiles** in the **Quick Find** box and open it. Then:
1. Select the profile you'd like to view and edit.
2. Click **Edit** at the top of the page.
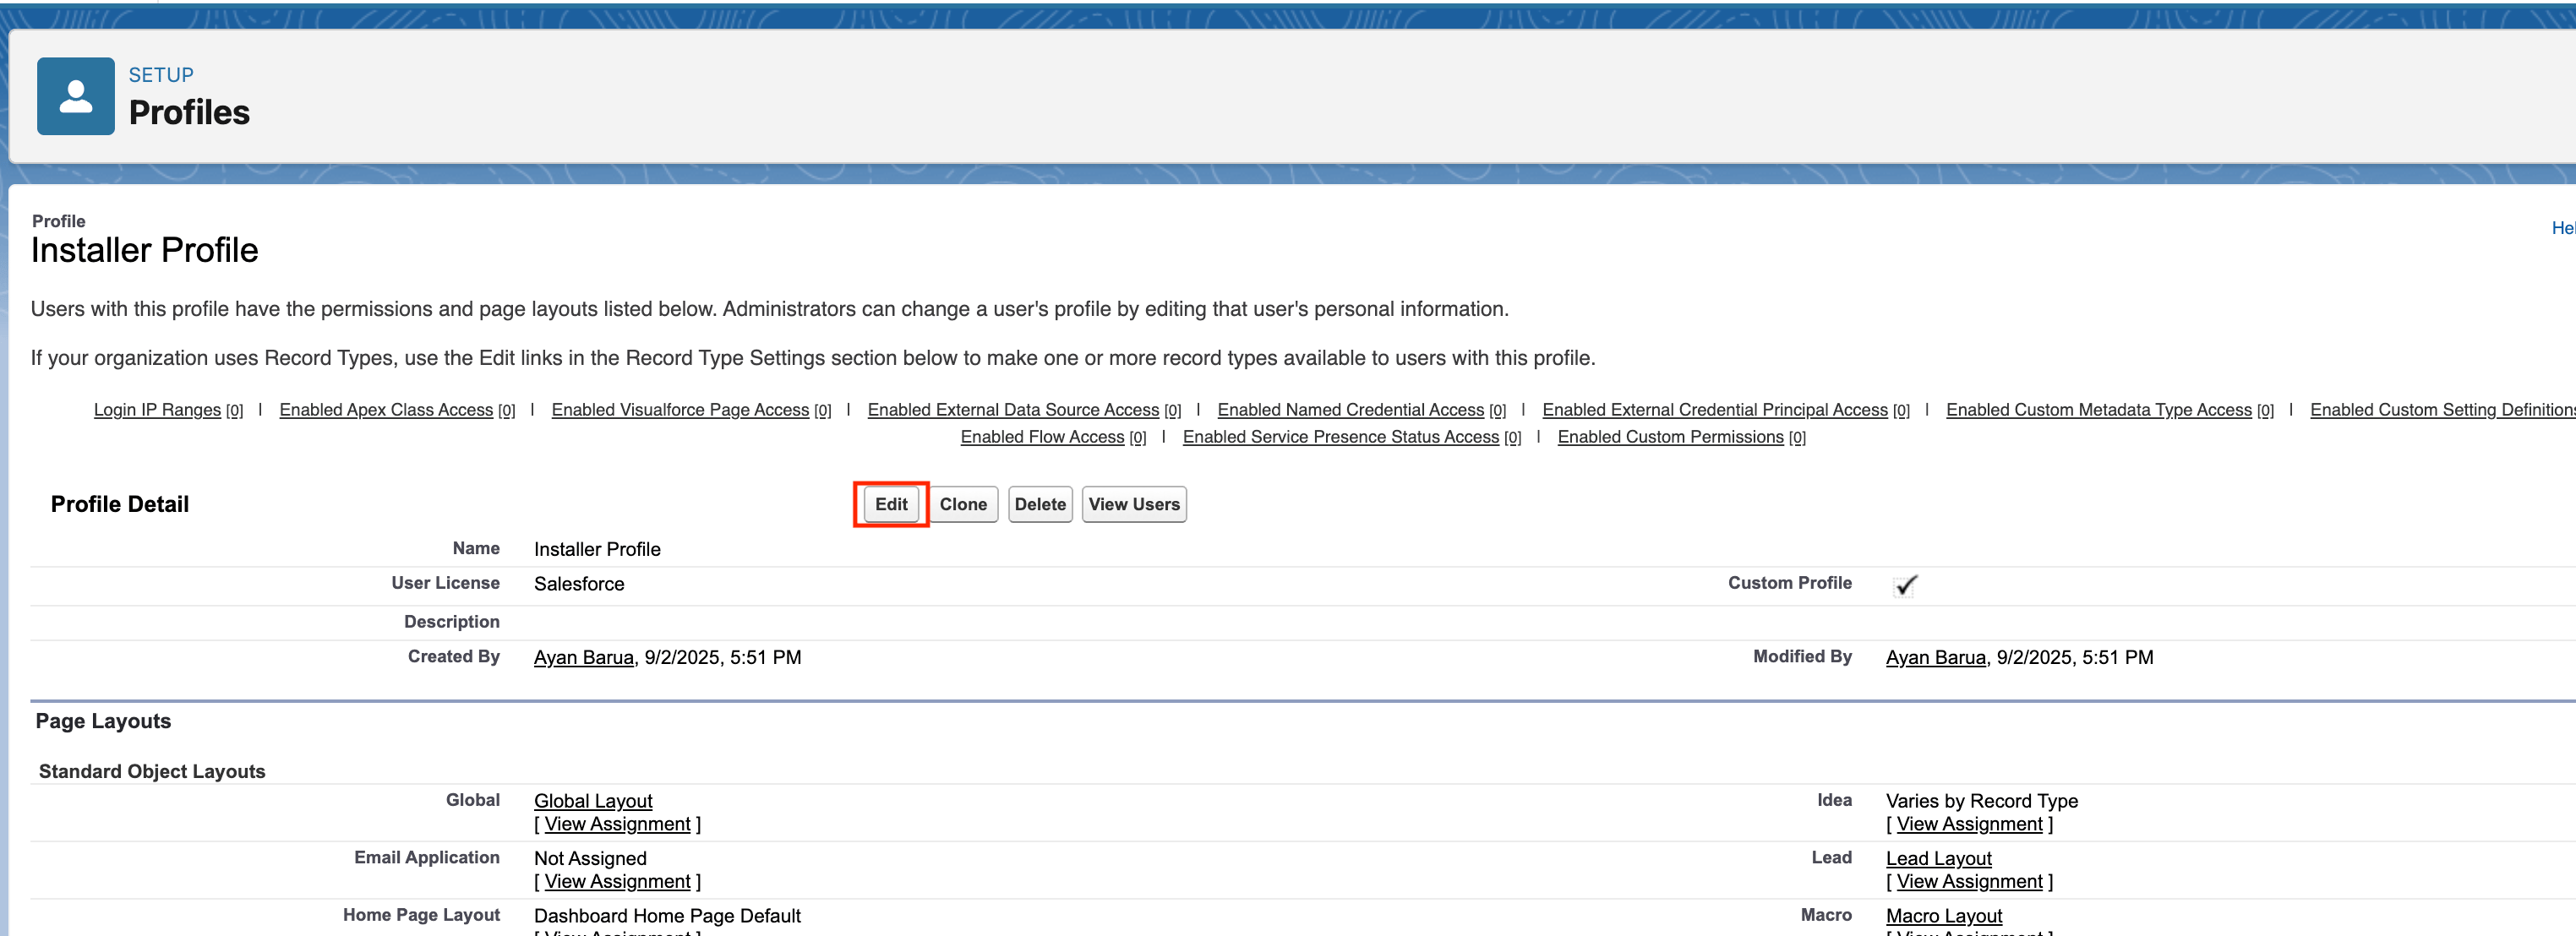 3. Ensure the checkboxes for the required system permissions (listed above) are checked.
4. Click **Save**.
#### 2a. Field permissions for a standard profile
If the user has a standard profile (such as **Standard User**):
1. Click the gear icon in the top-right corner and select **Setup**.
2. In the left-hand search bar, type **Object Manager** and open it.
3. Ensure the checkboxes for the required system permissions (listed above) are checked.
4. Click **Save**.
#### 2a. Field permissions for a standard profile
If the user has a standard profile (such as **Standard User**):
1. Click the gear icon in the top-right corner and select **Setup**.
2. In the left-hand search bar, type **Object Manager** and open it.
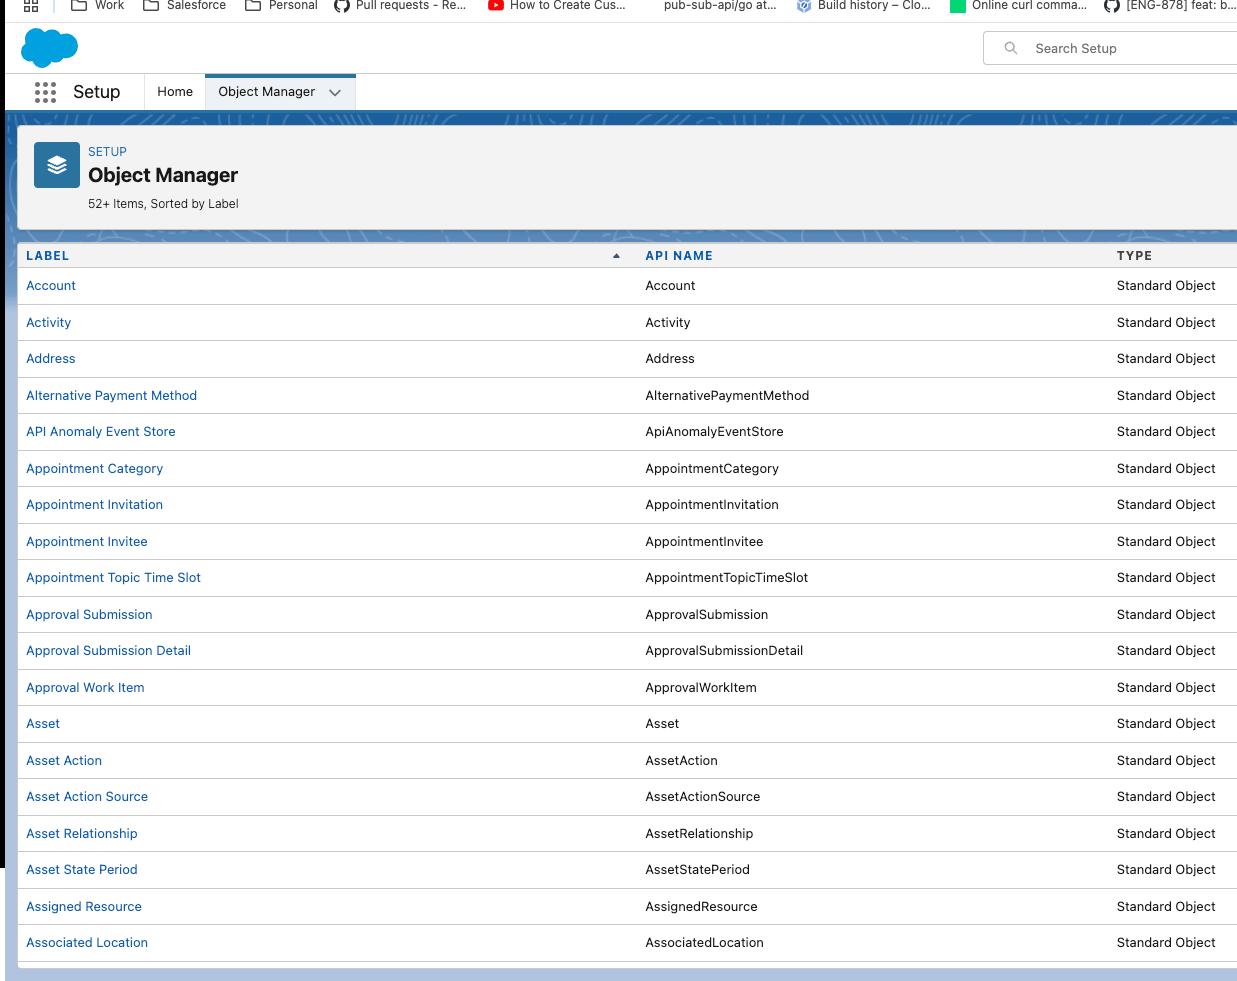 3. Choose the object you need (for example, **Account**), then select **Fields & Relationships** from the left navbar.
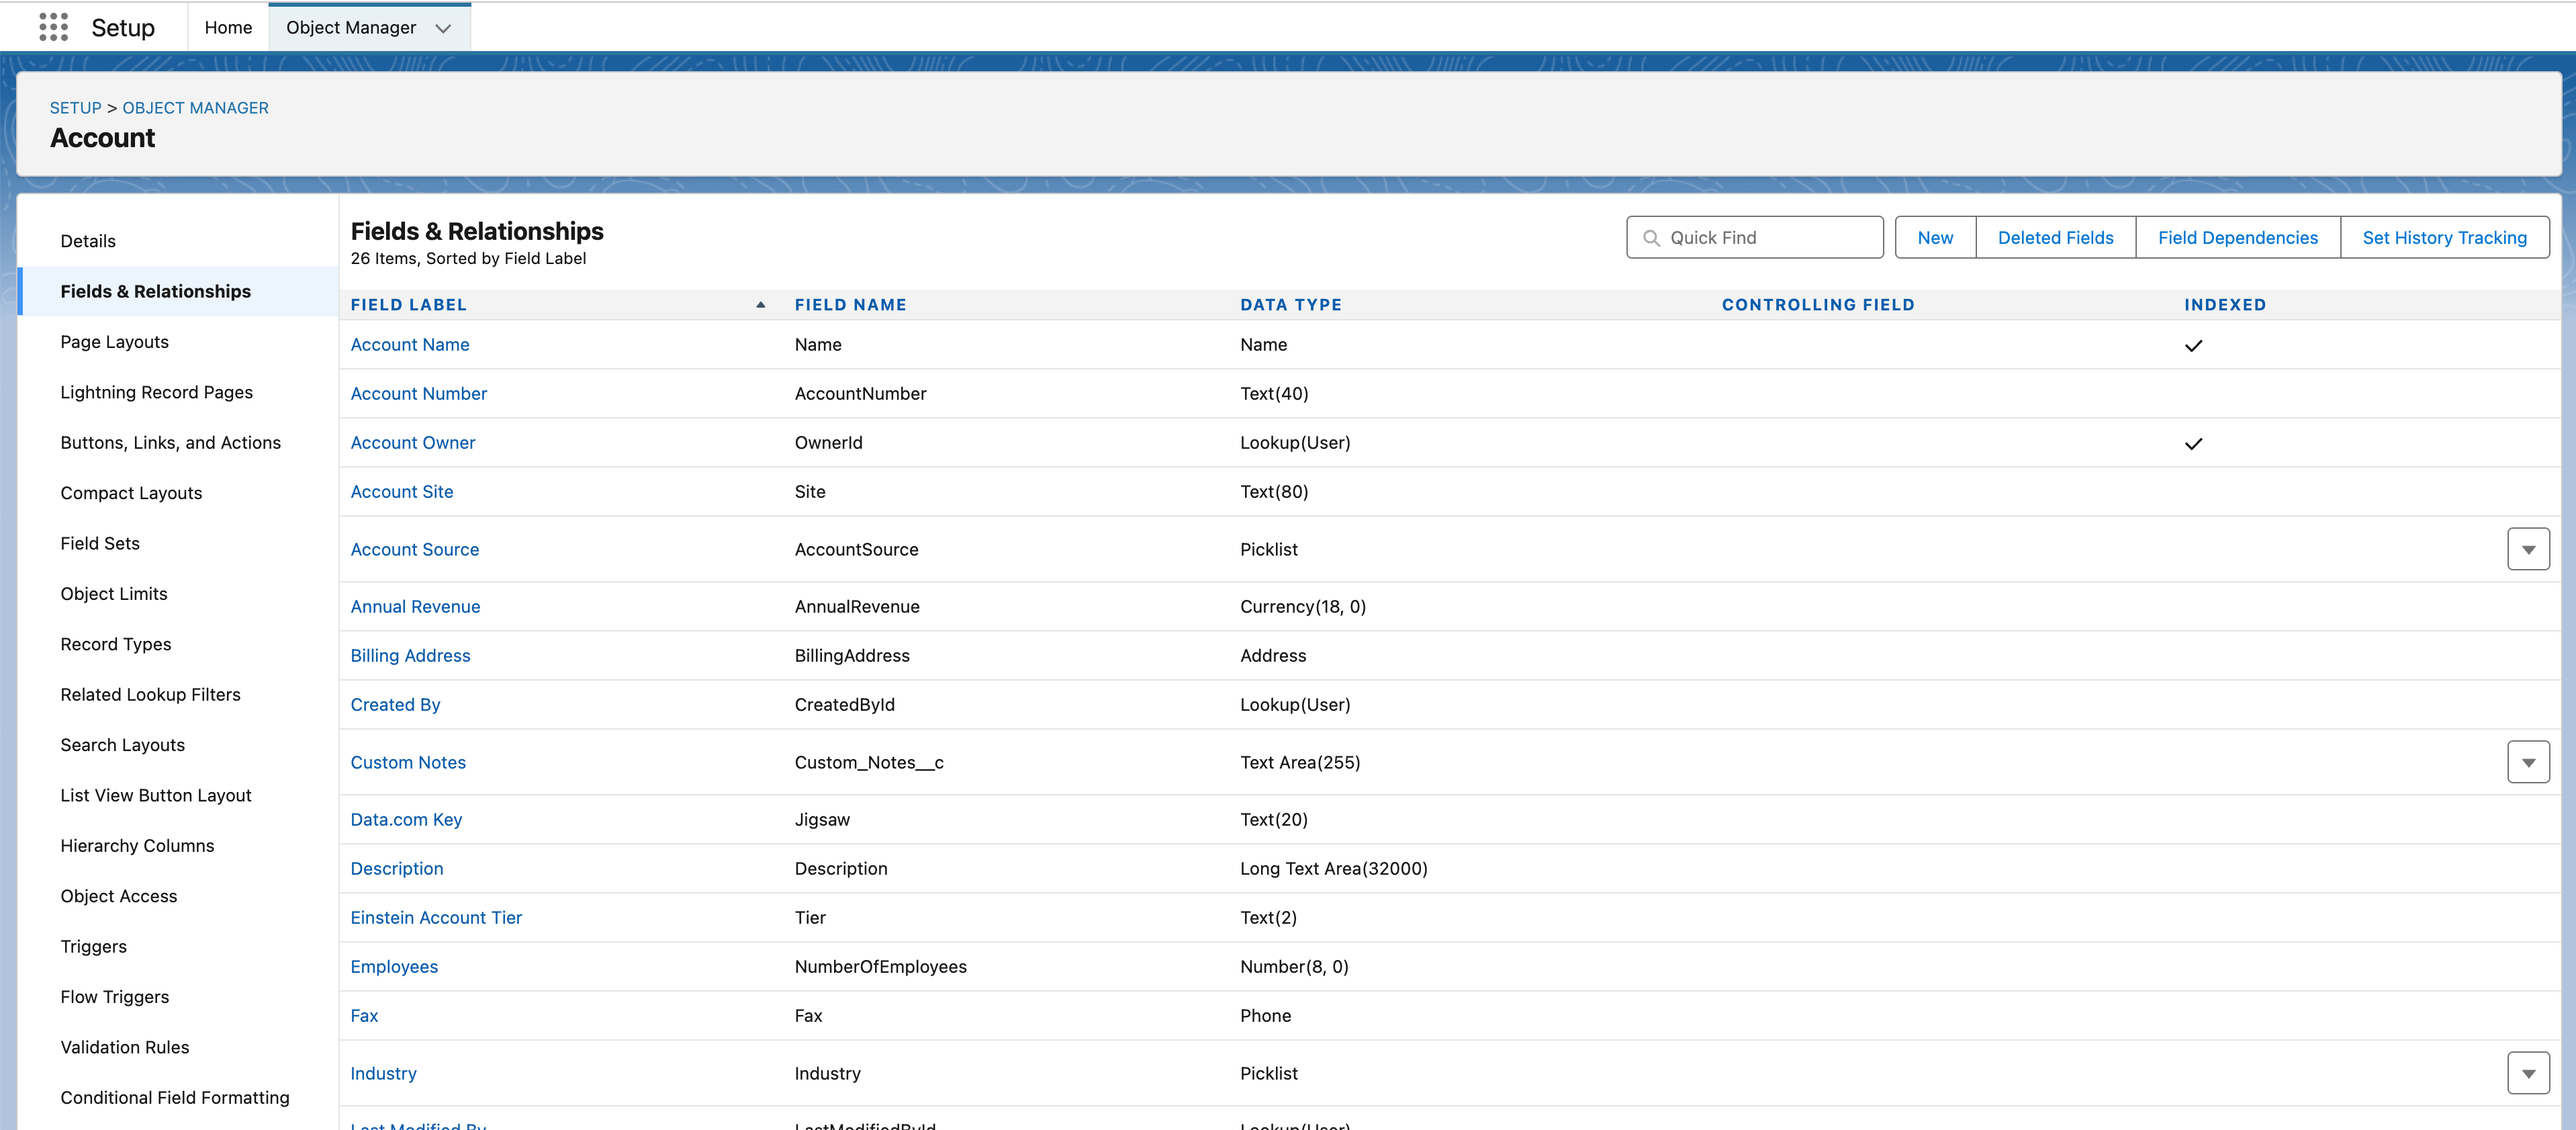 4. Find the field you want to adjust and click it.
5. Click **Set Field-Level Security**.
4. Find the field you want to adjust and click it.
5. Click **Set Field-Level Security**.
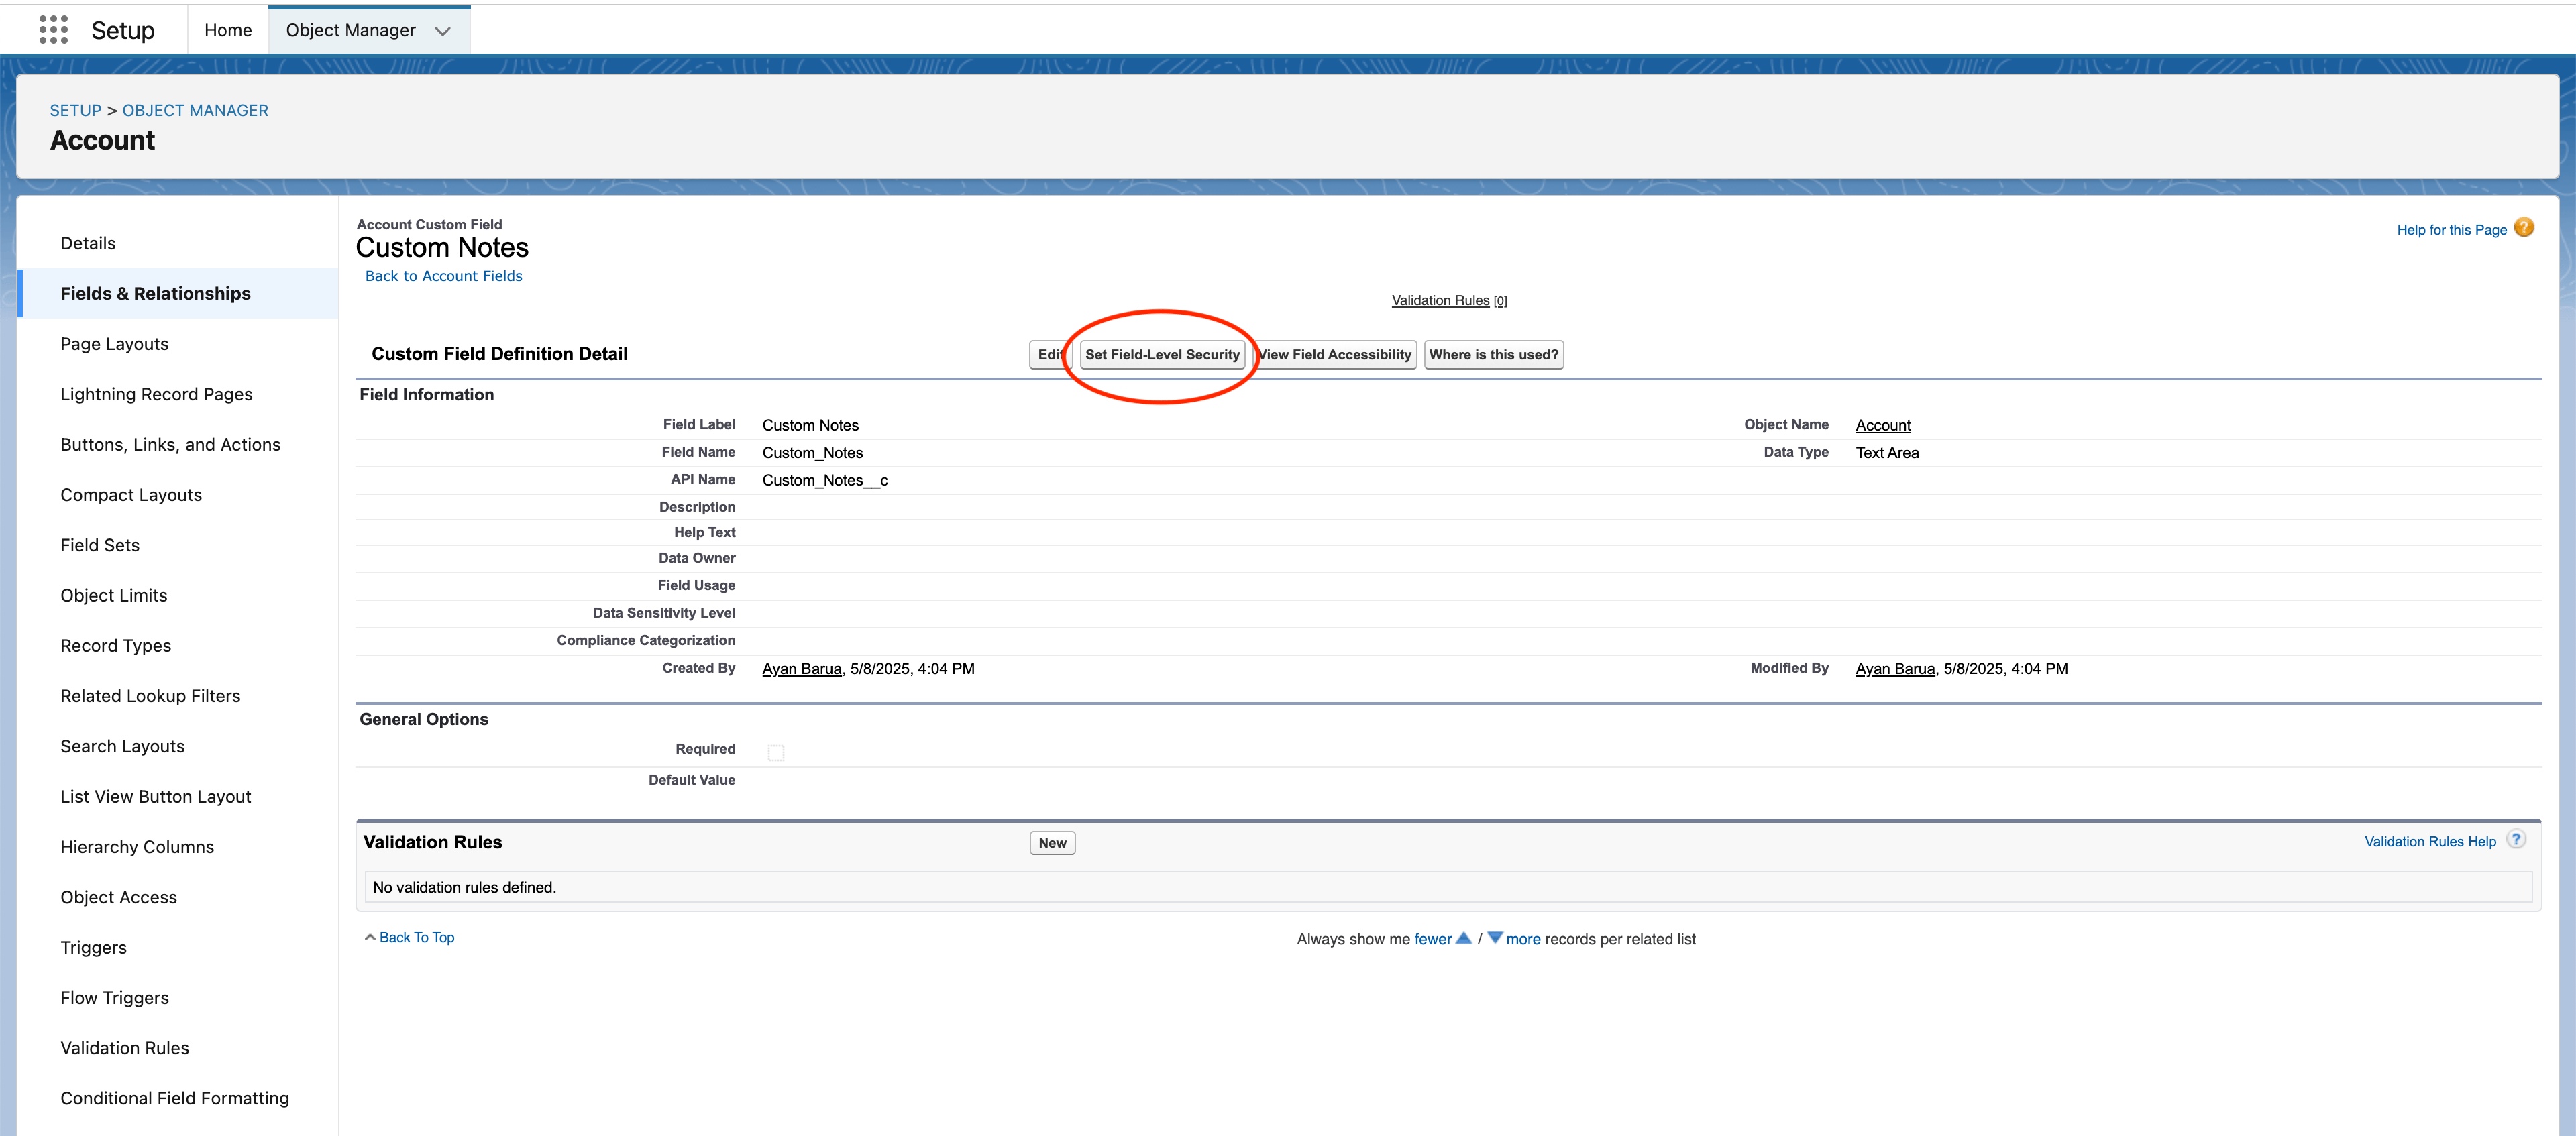 6. Ensure **Visible** is selected for the profile. If the profile is not in the list, it does not have access to the object and that cannot be changed here.
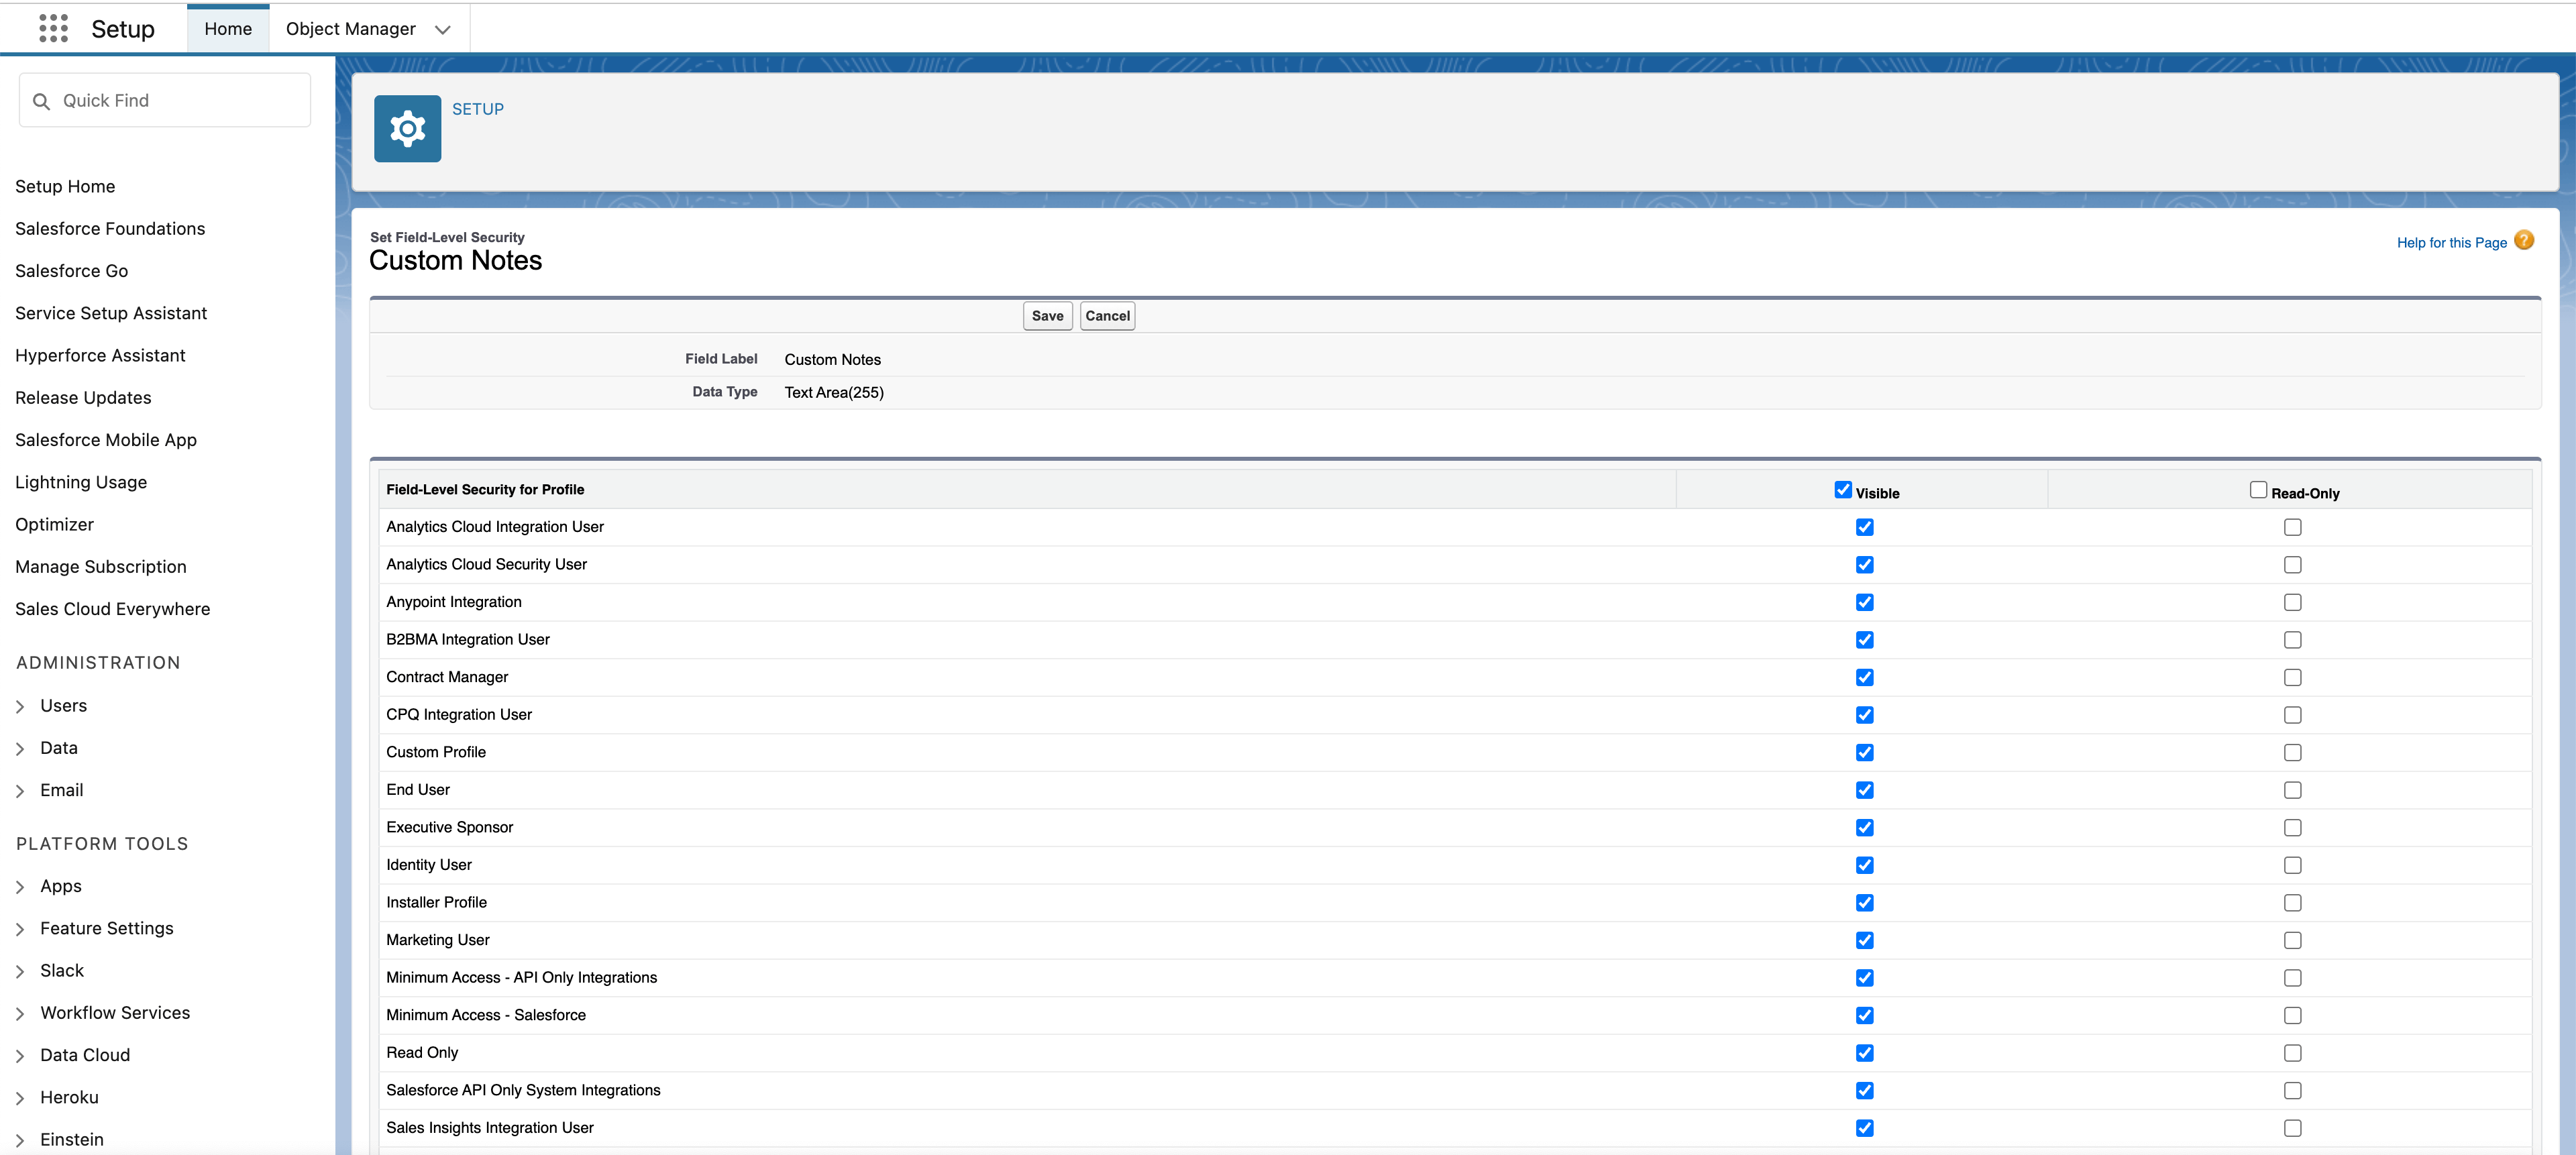 7. Repeat steps 4–6 for all fields the integration needs to read, especially custom fields.
#### 2b. Object and field permissions for a custom profile
If the user has a custom profile:
1. Click the gear icon in the top-right corner and select **Setup**.
2. In the left-hand search bar, type **Object Manager** and open it.
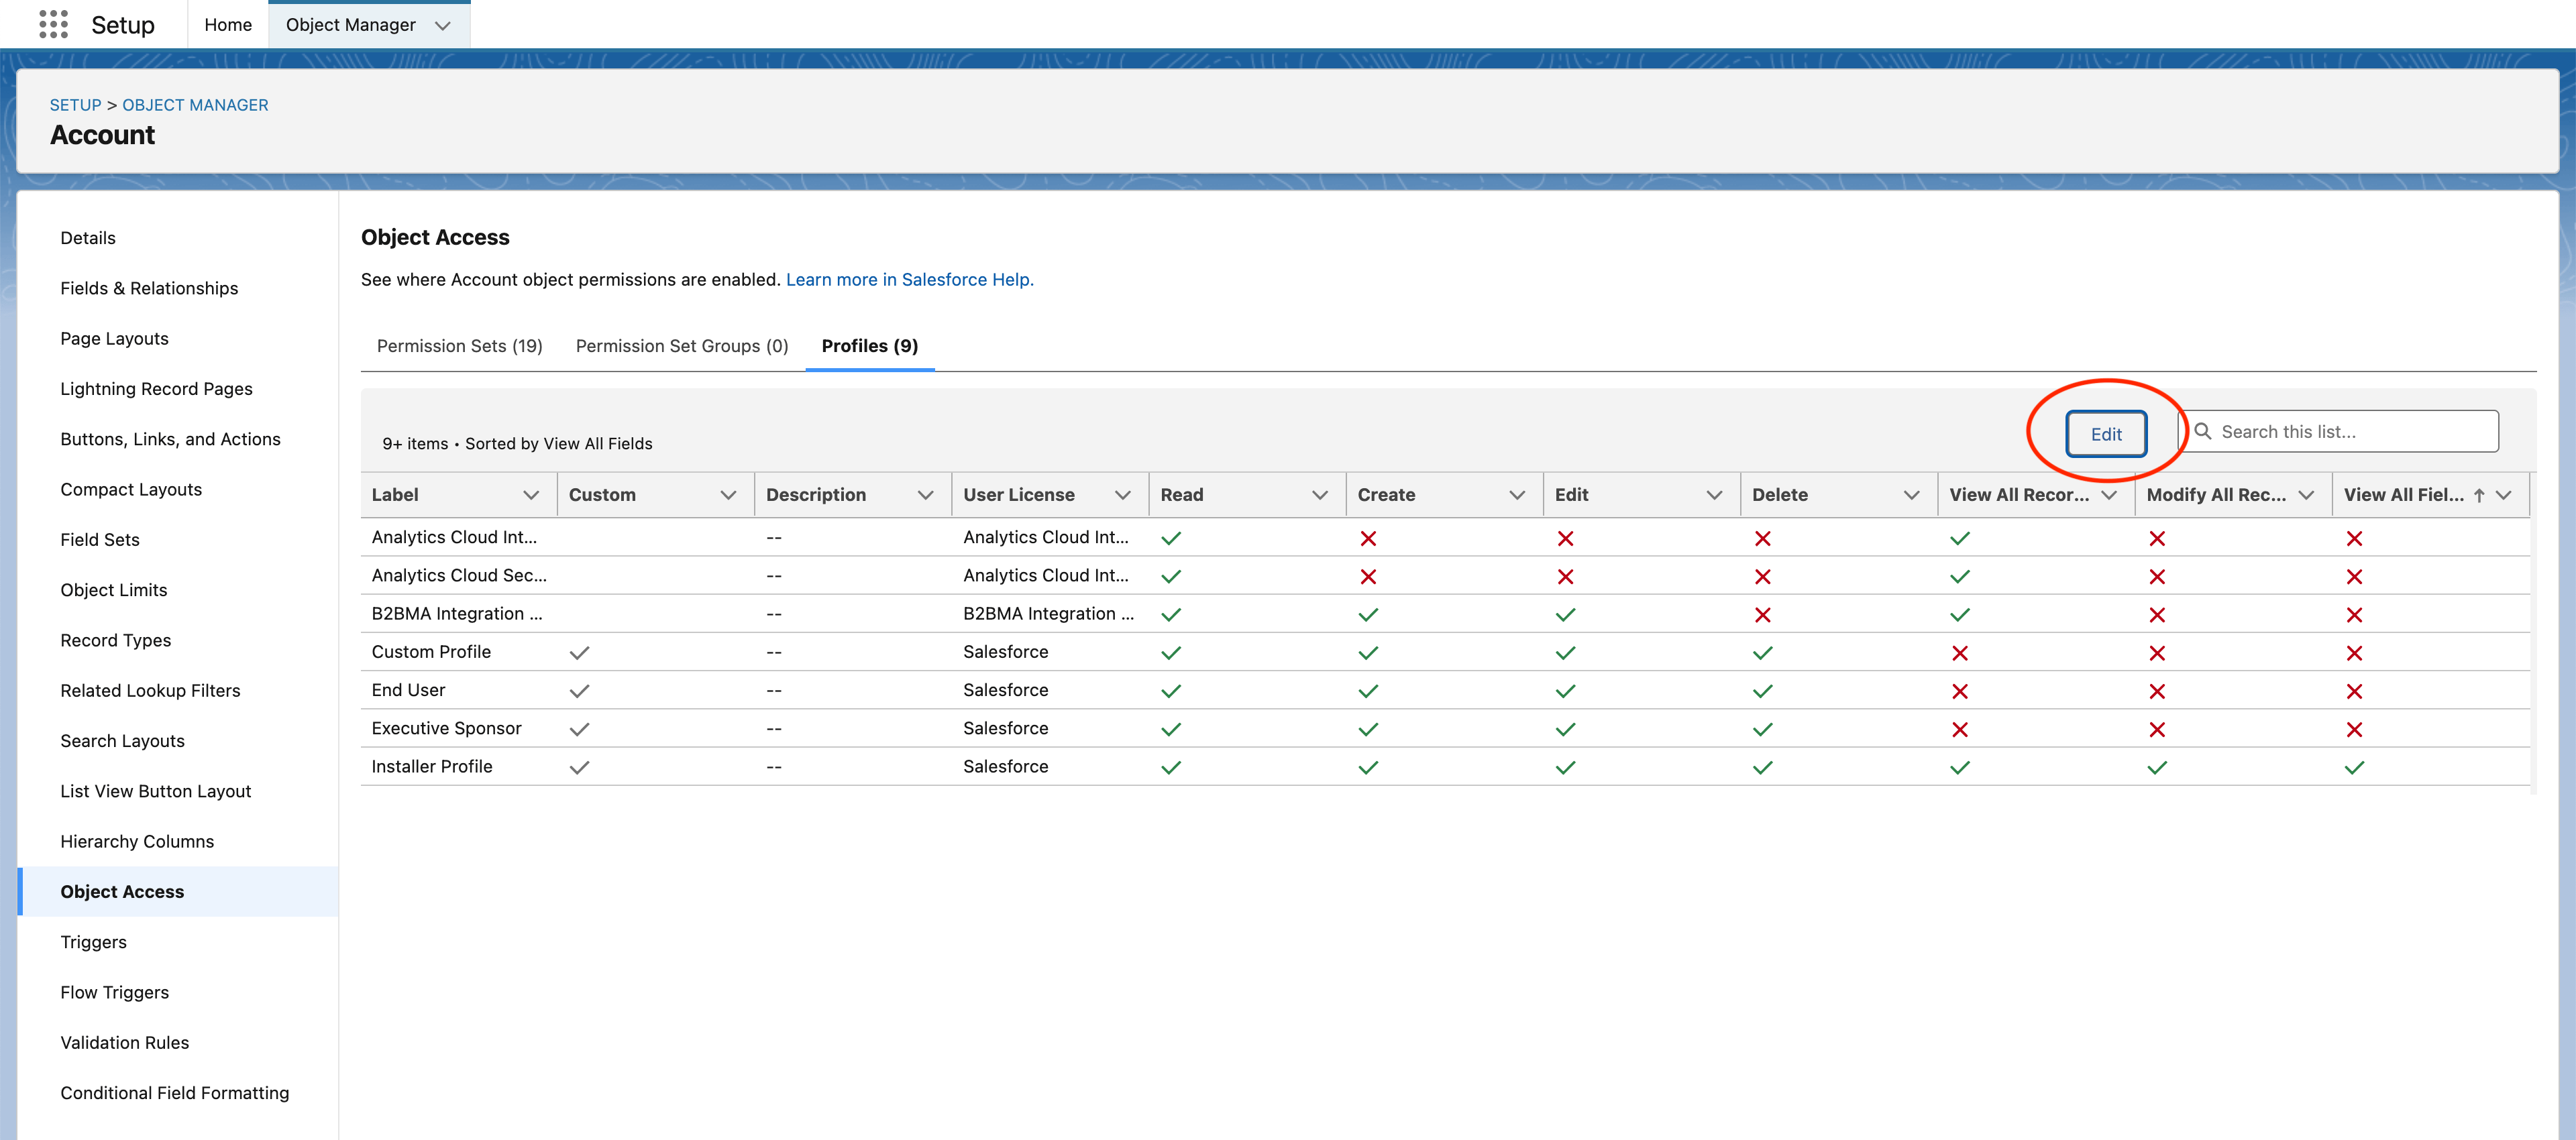
3. Choose the object you need (for example, **Account**) and go to **Object Access** in the left navbar. Select the **Profiles** tab, click **Edit**, and grant the necessary permissions for your custom profile.
* If the integration needs to read data, ensure **Read**, **View All Records**, and **View All Fields** are checked.
* If the integration needs to write data, ensure all boxes are checked.
7. Repeat steps 4–6 for all fields the integration needs to read, especially custom fields.
#### 2b. Object and field permissions for a custom profile
If the user has a custom profile:
1. Click the gear icon in the top-right corner and select **Setup**.
2. In the left-hand search bar, type **Object Manager** and open it.
3. Choose the object you need (for example, **Account**) and go to **Object Access** in the left navbar. Select the **Profiles** tab, click **Edit**, and grant the necessary permissions for your custom profile.
* If the integration needs to read data, ensure **Read**, **View All Records**, and **View All Fields** are checked.
* If the integration needs to write data, ensure all boxes are checked.
 ### Option B: Salesforce Integration user
Use a **Salesforce Integration** user when you want an API-only identity with no Salesforce UI access. Create the user with the **Salesforce Integration** license (steps below).
#### 1. Create a new user
1. Click the gear icon in the top-right corner and select **Setup**.
2. In the left-hand search bar, type **Users** and open it.
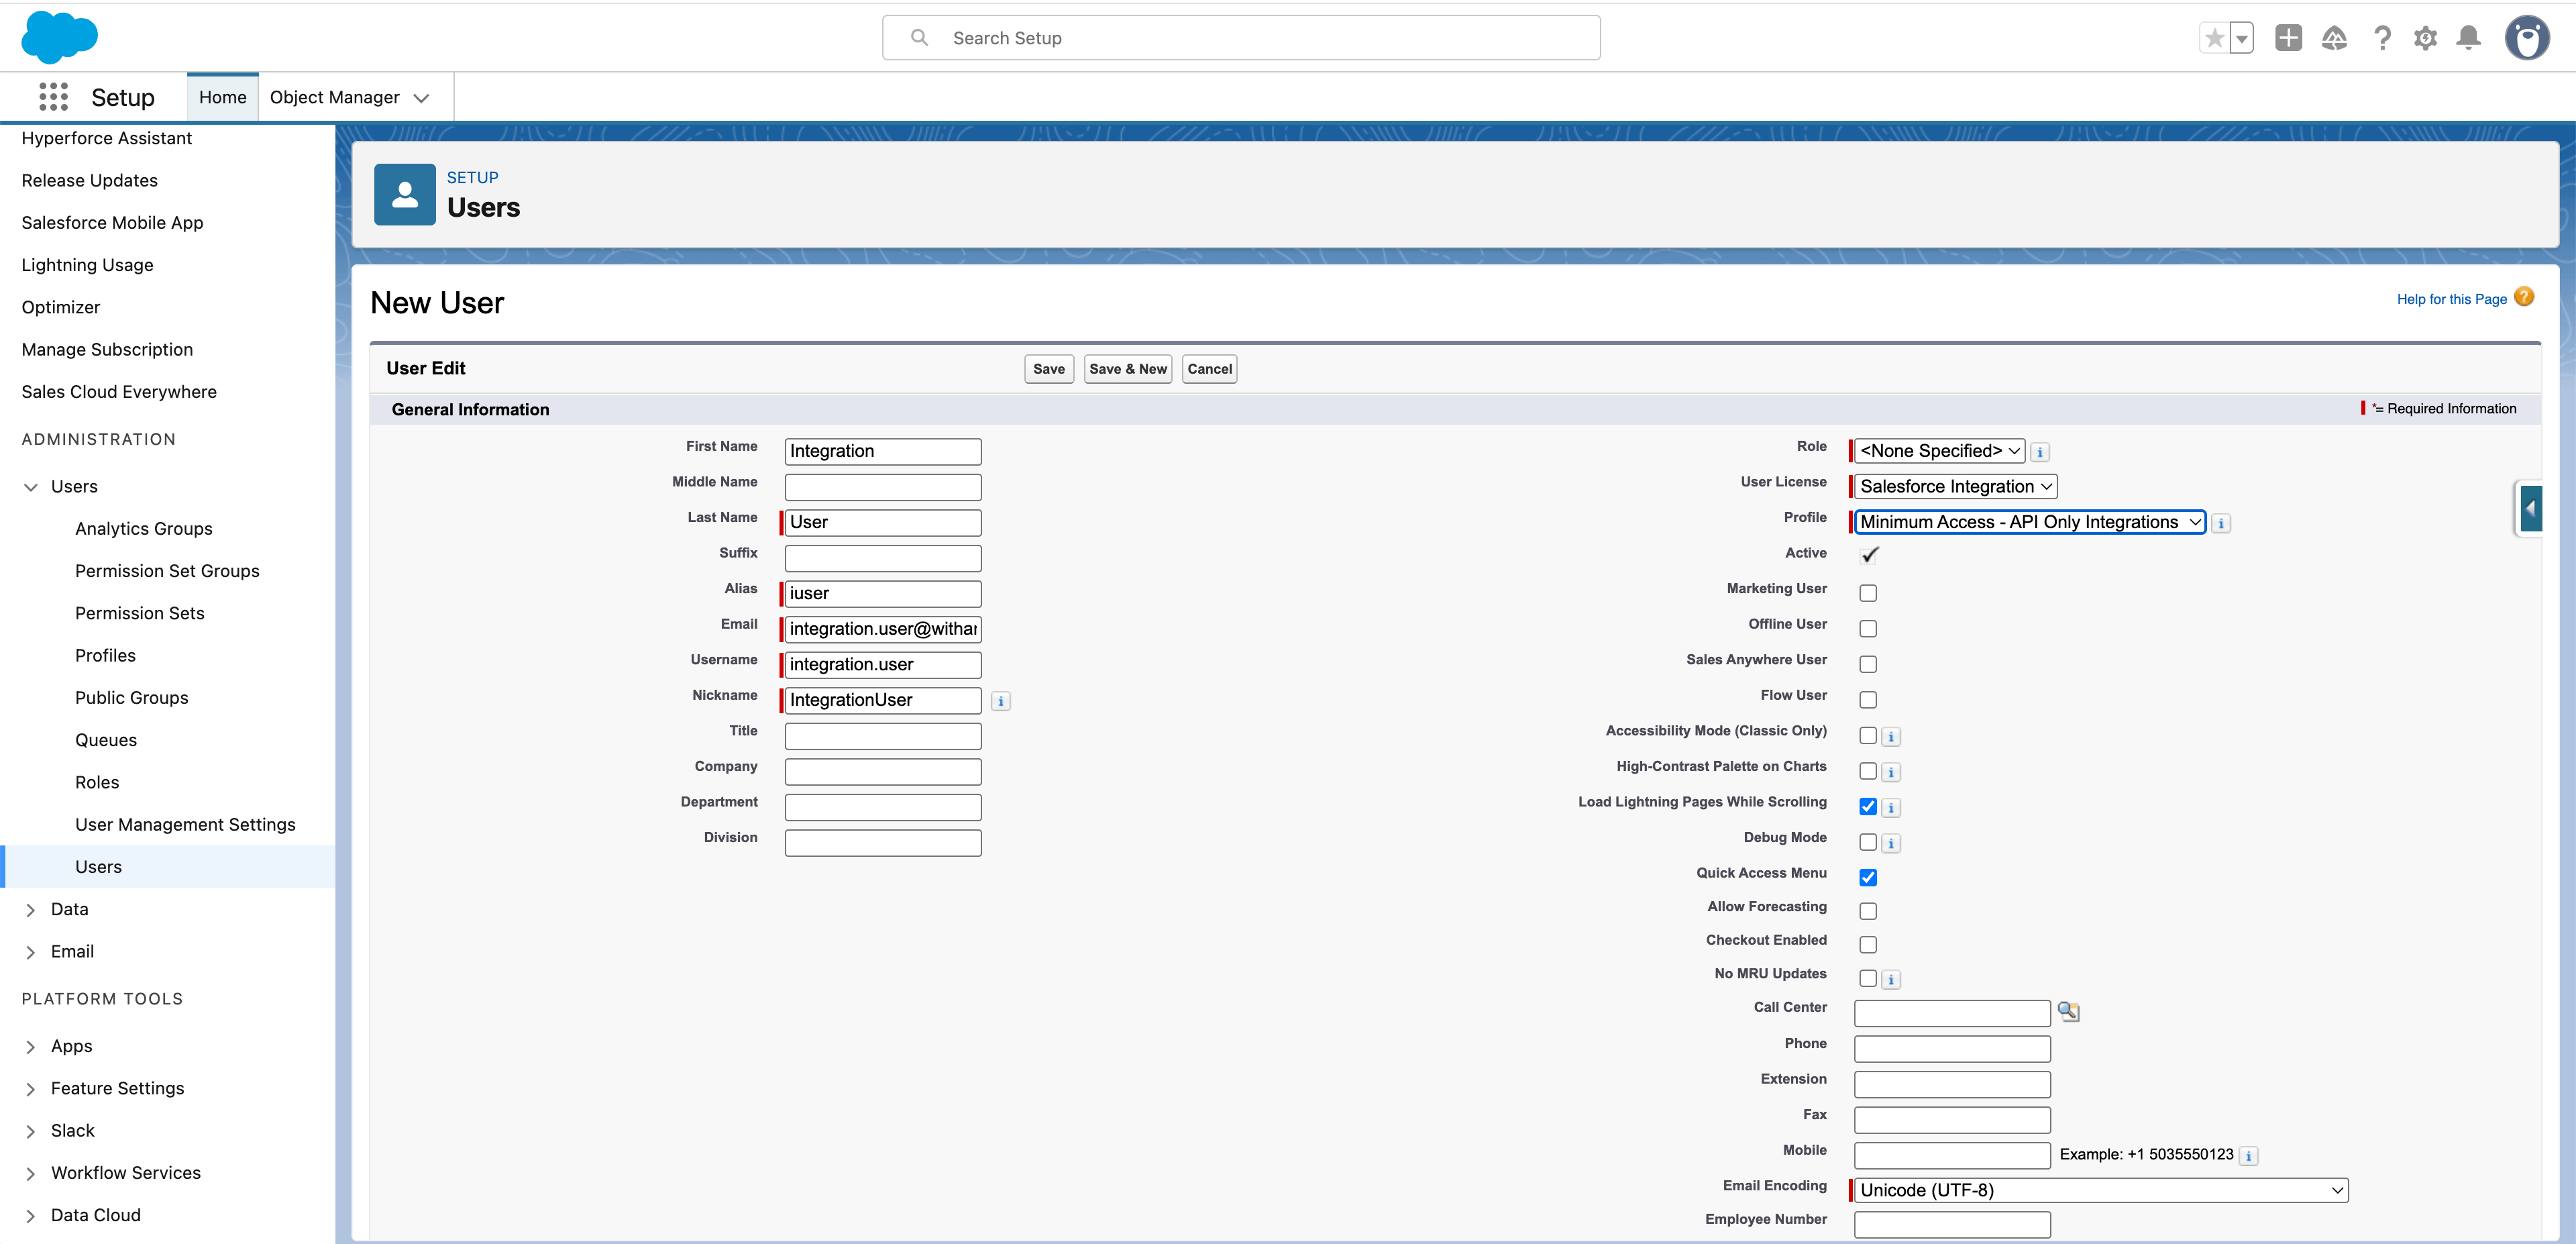
3. Create a new user:
* For **User License**, select **Salesforce Integration**.
* For **Profile**, select **Minimum Access - API Only Integrations**.
### Option B: Salesforce Integration user
Use a **Salesforce Integration** user when you want an API-only identity with no Salesforce UI access. Create the user with the **Salesforce Integration** license (steps below).
#### 1. Create a new user
1. Click the gear icon in the top-right corner and select **Setup**.
2. In the left-hand search bar, type **Users** and open it.
3. Create a new user:
* For **User License**, select **Salesforce Integration**.
* For **Profile**, select **Minimum Access - API Only Integrations**.
 #### 2. Create a permission set
1. Click the gear icon in the top-right corner and select **Setup**.
2. In the left-hand search bar, type **Permission Sets** and open it.
3. Click **New**.
#### 2. Create a permission set
1. Click the gear icon in the top-right corner and select **Setup**.
2. In the left-hand search bar, type **Permission Sets** and open it.
3. Click **New**.
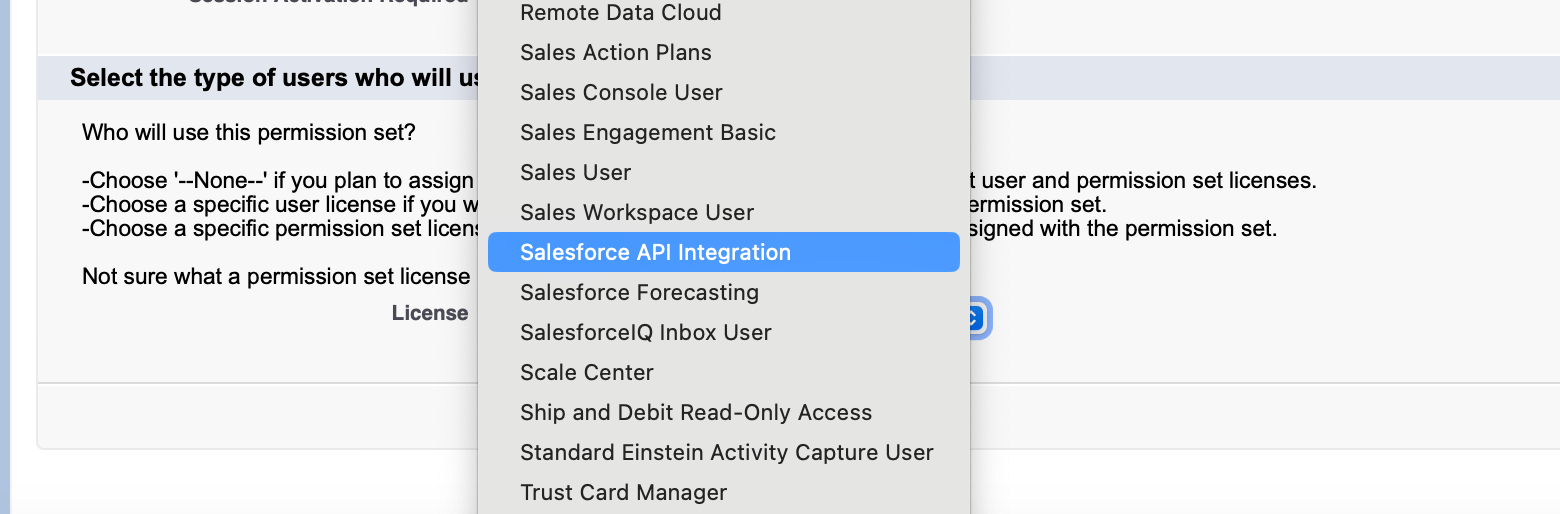
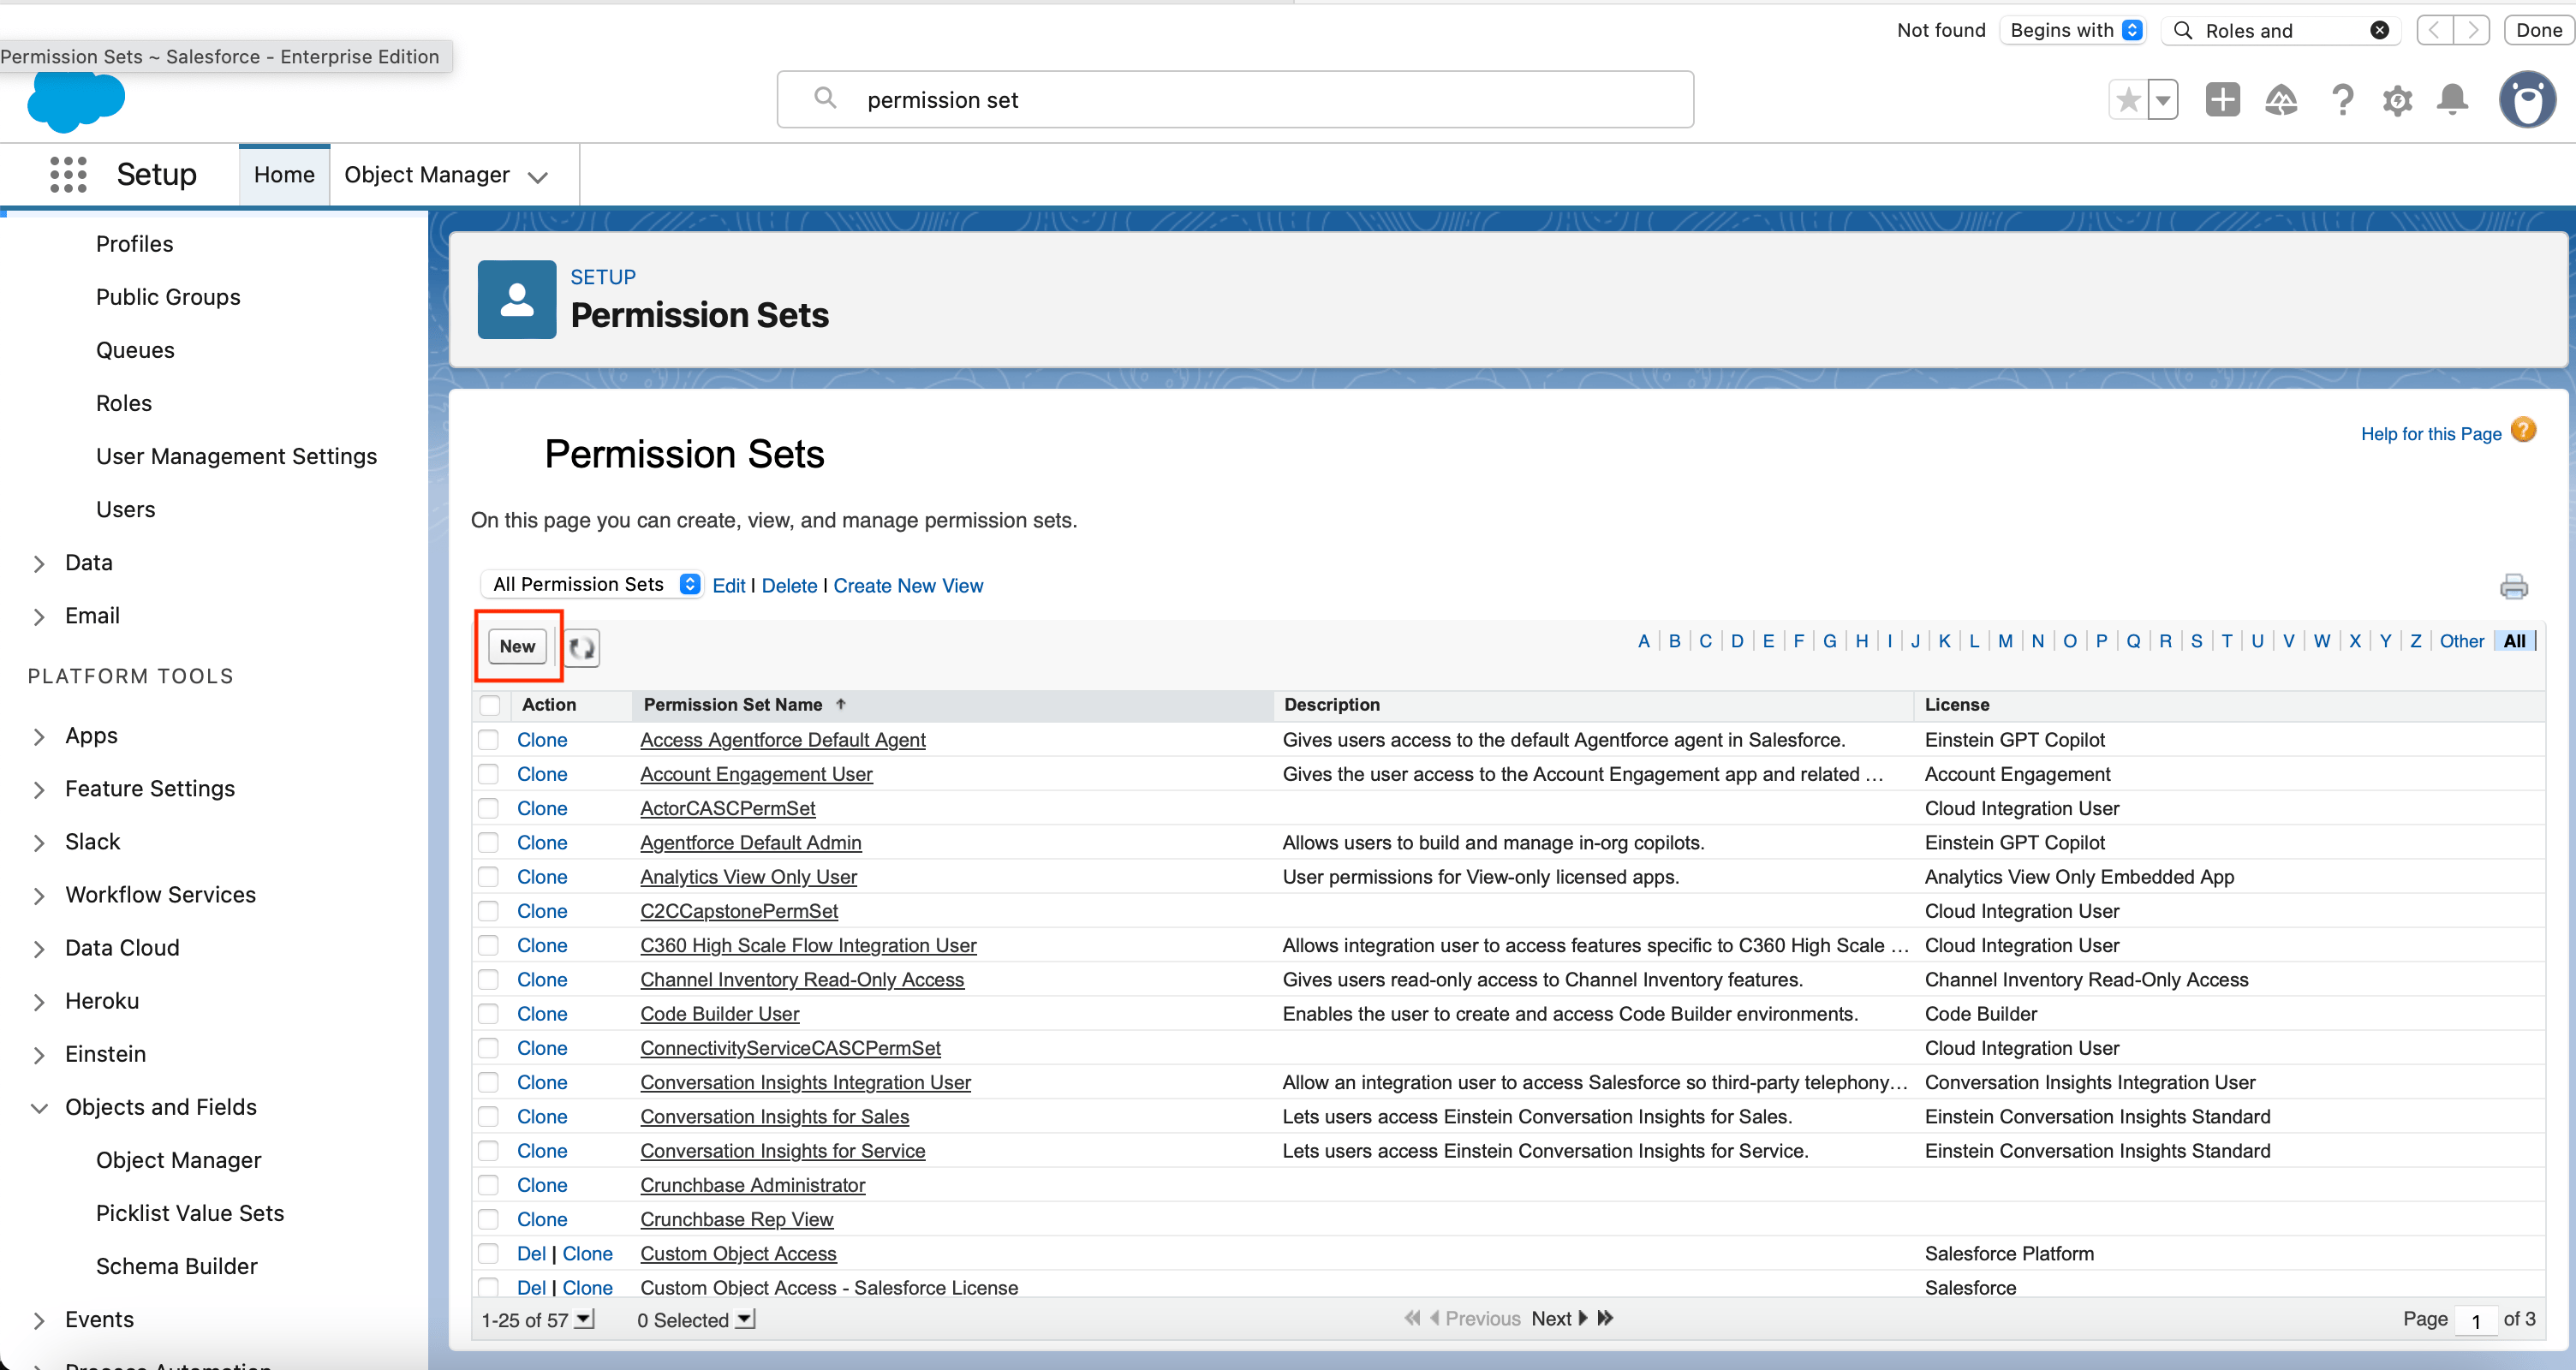 4. Create the permission set:
* Name it something general (for example, `Integration User Permission Set`) or describe the access (for example, `Account and Contact Access`).
* In the **License** dropdown, select **Salesforce API Integration**.
4. Create the permission set:
* Name it something general (for example, `Integration User Permission Set`) or describe the access (for example, `Account and Contact Access`).
* In the **License** dropdown, select **Salesforce API Integration**.
 #### 3. Configure object permissions
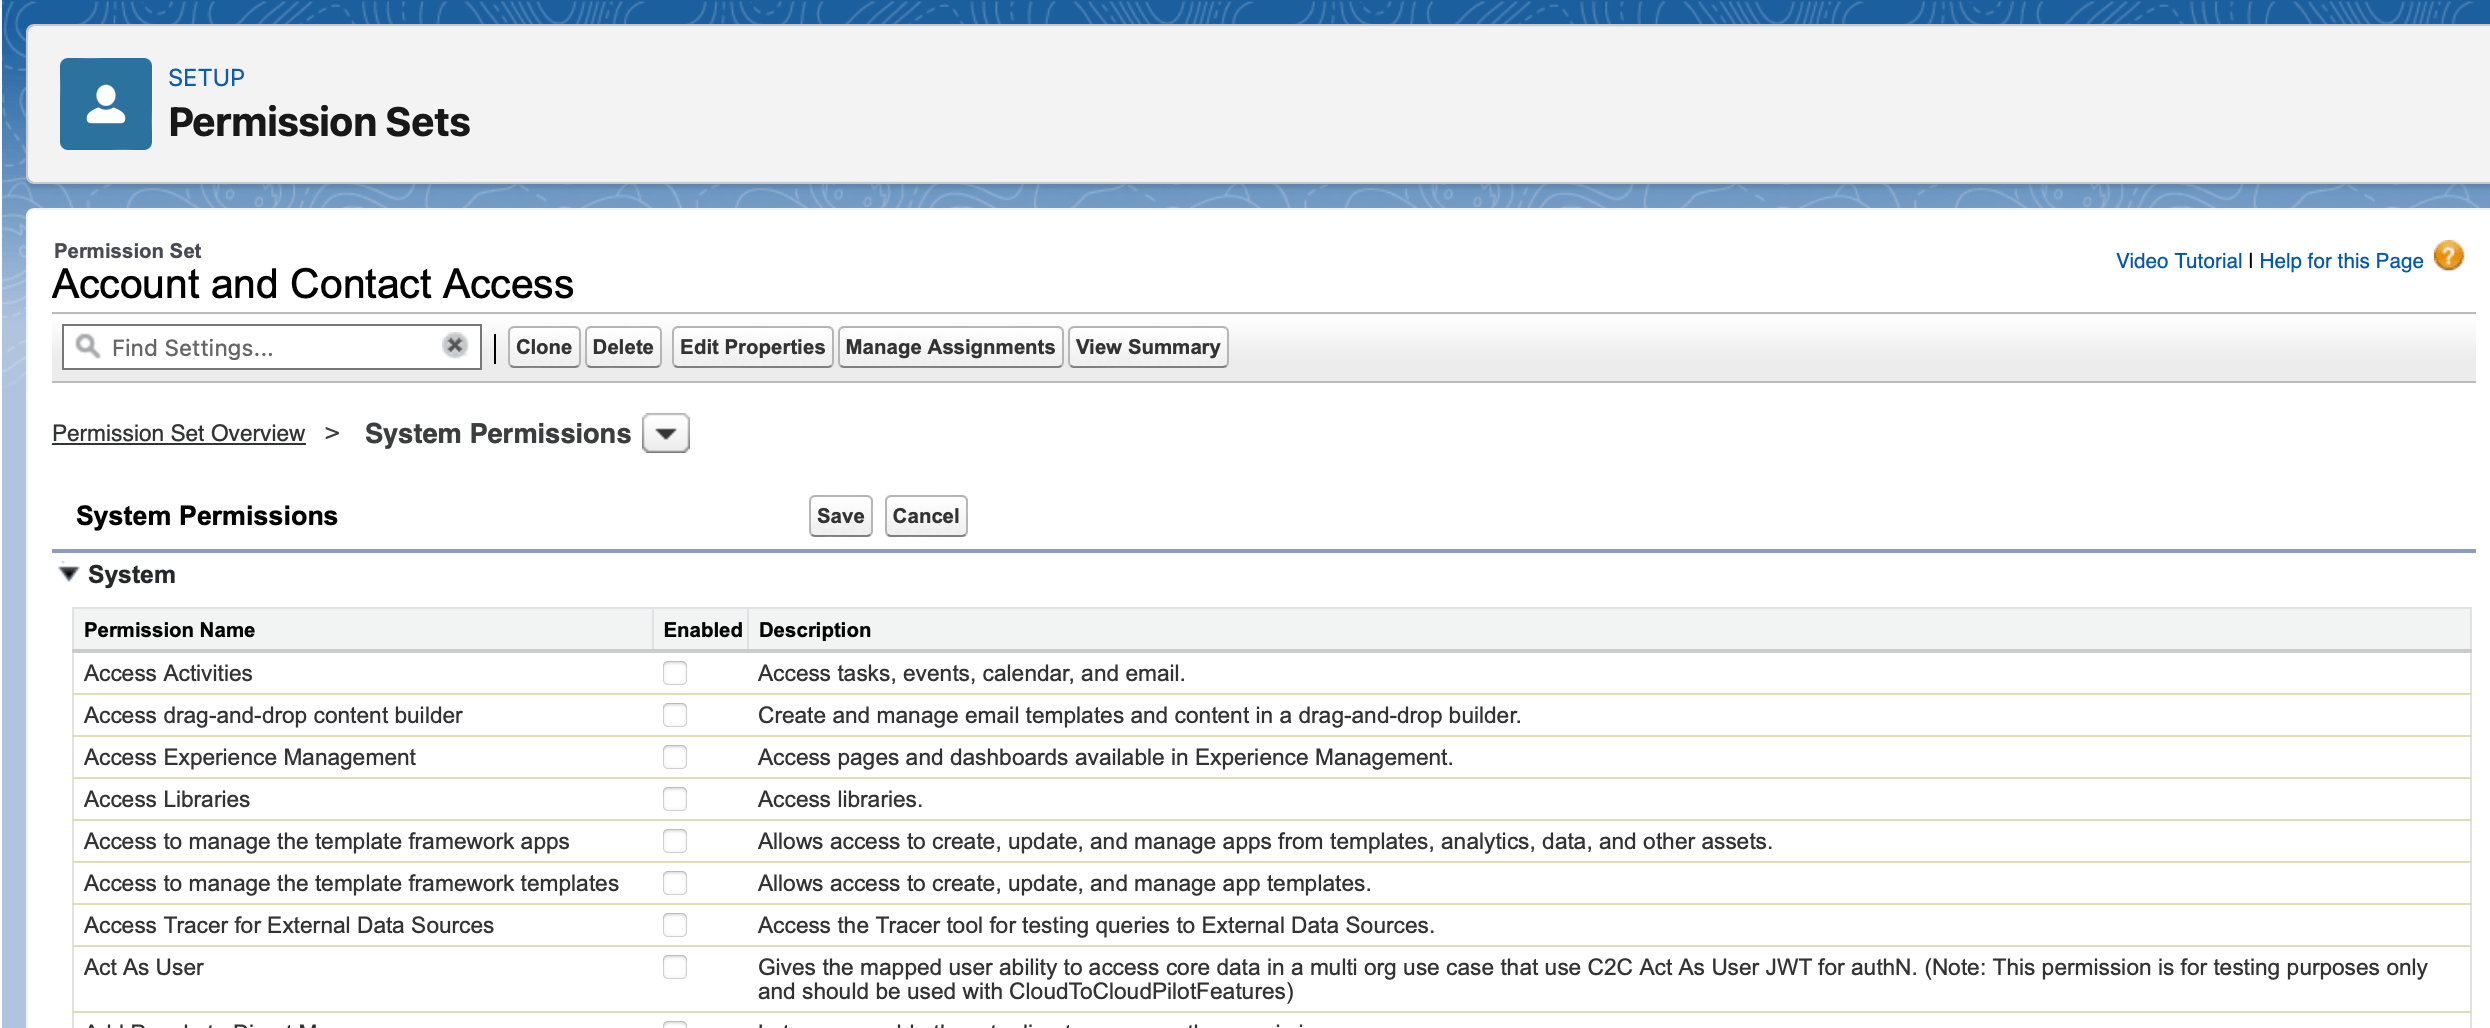
1. Click **Object Settings**.
#### 3. Configure object permissions
1. Click **Object Settings**.
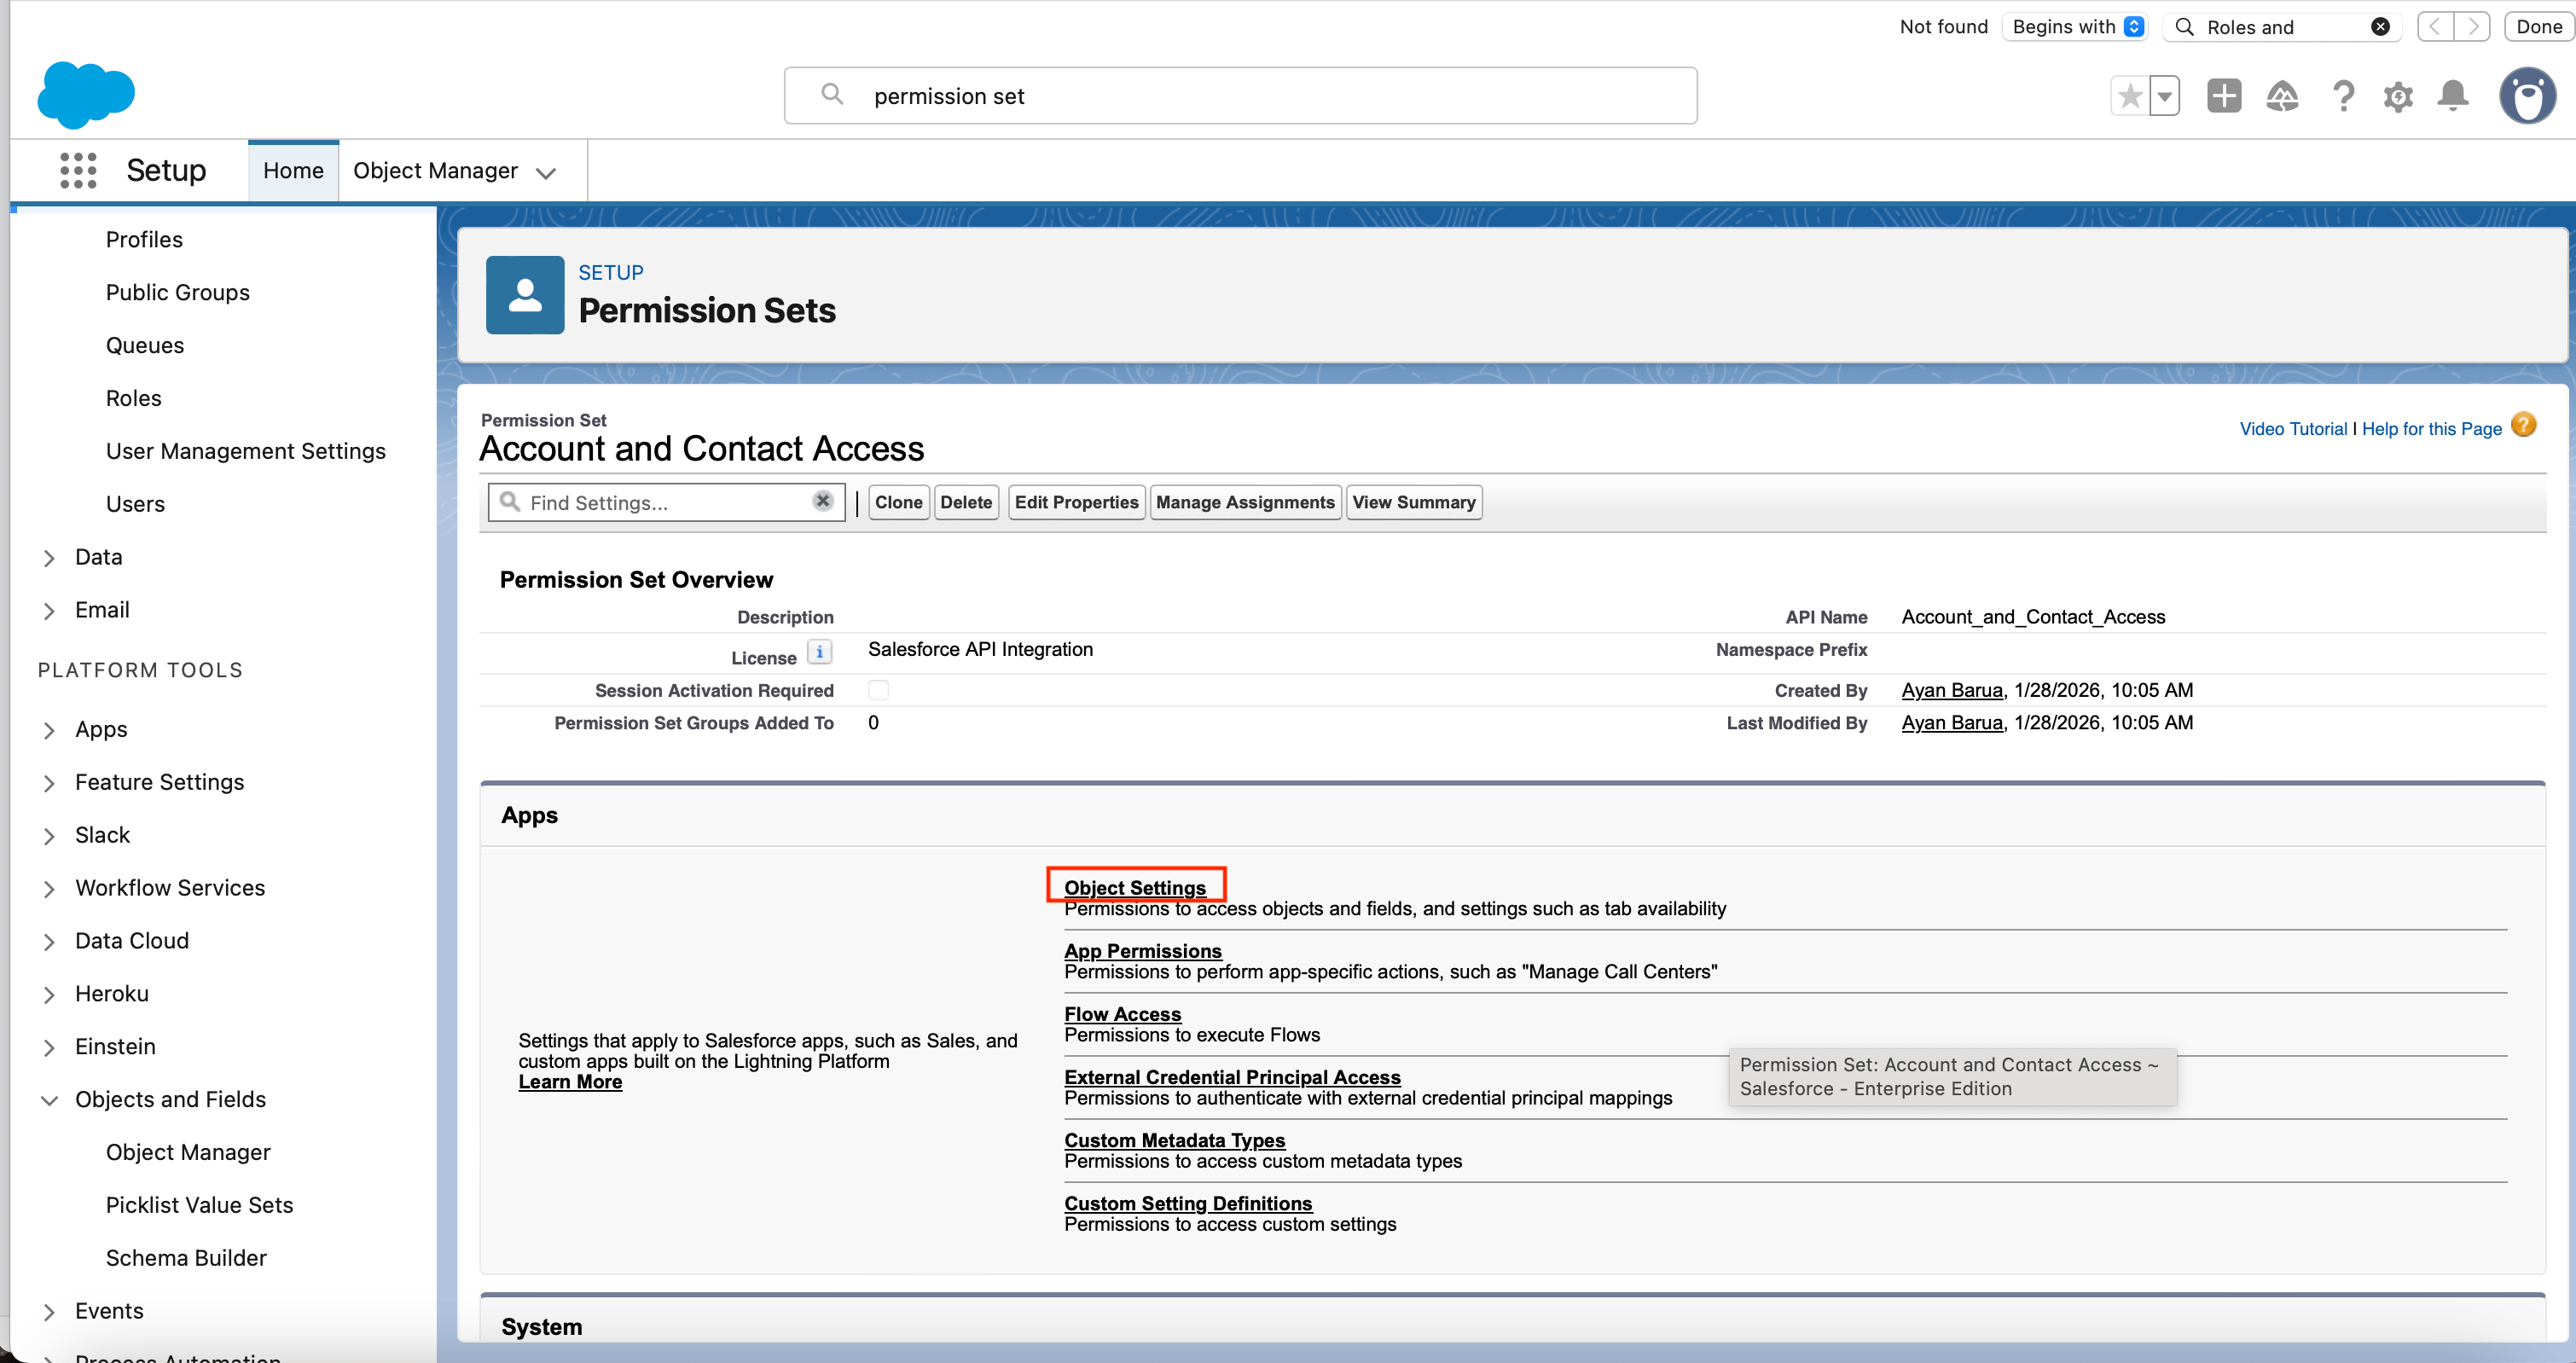 2. For each object the integration needs, open it (for example, **Accounts**).
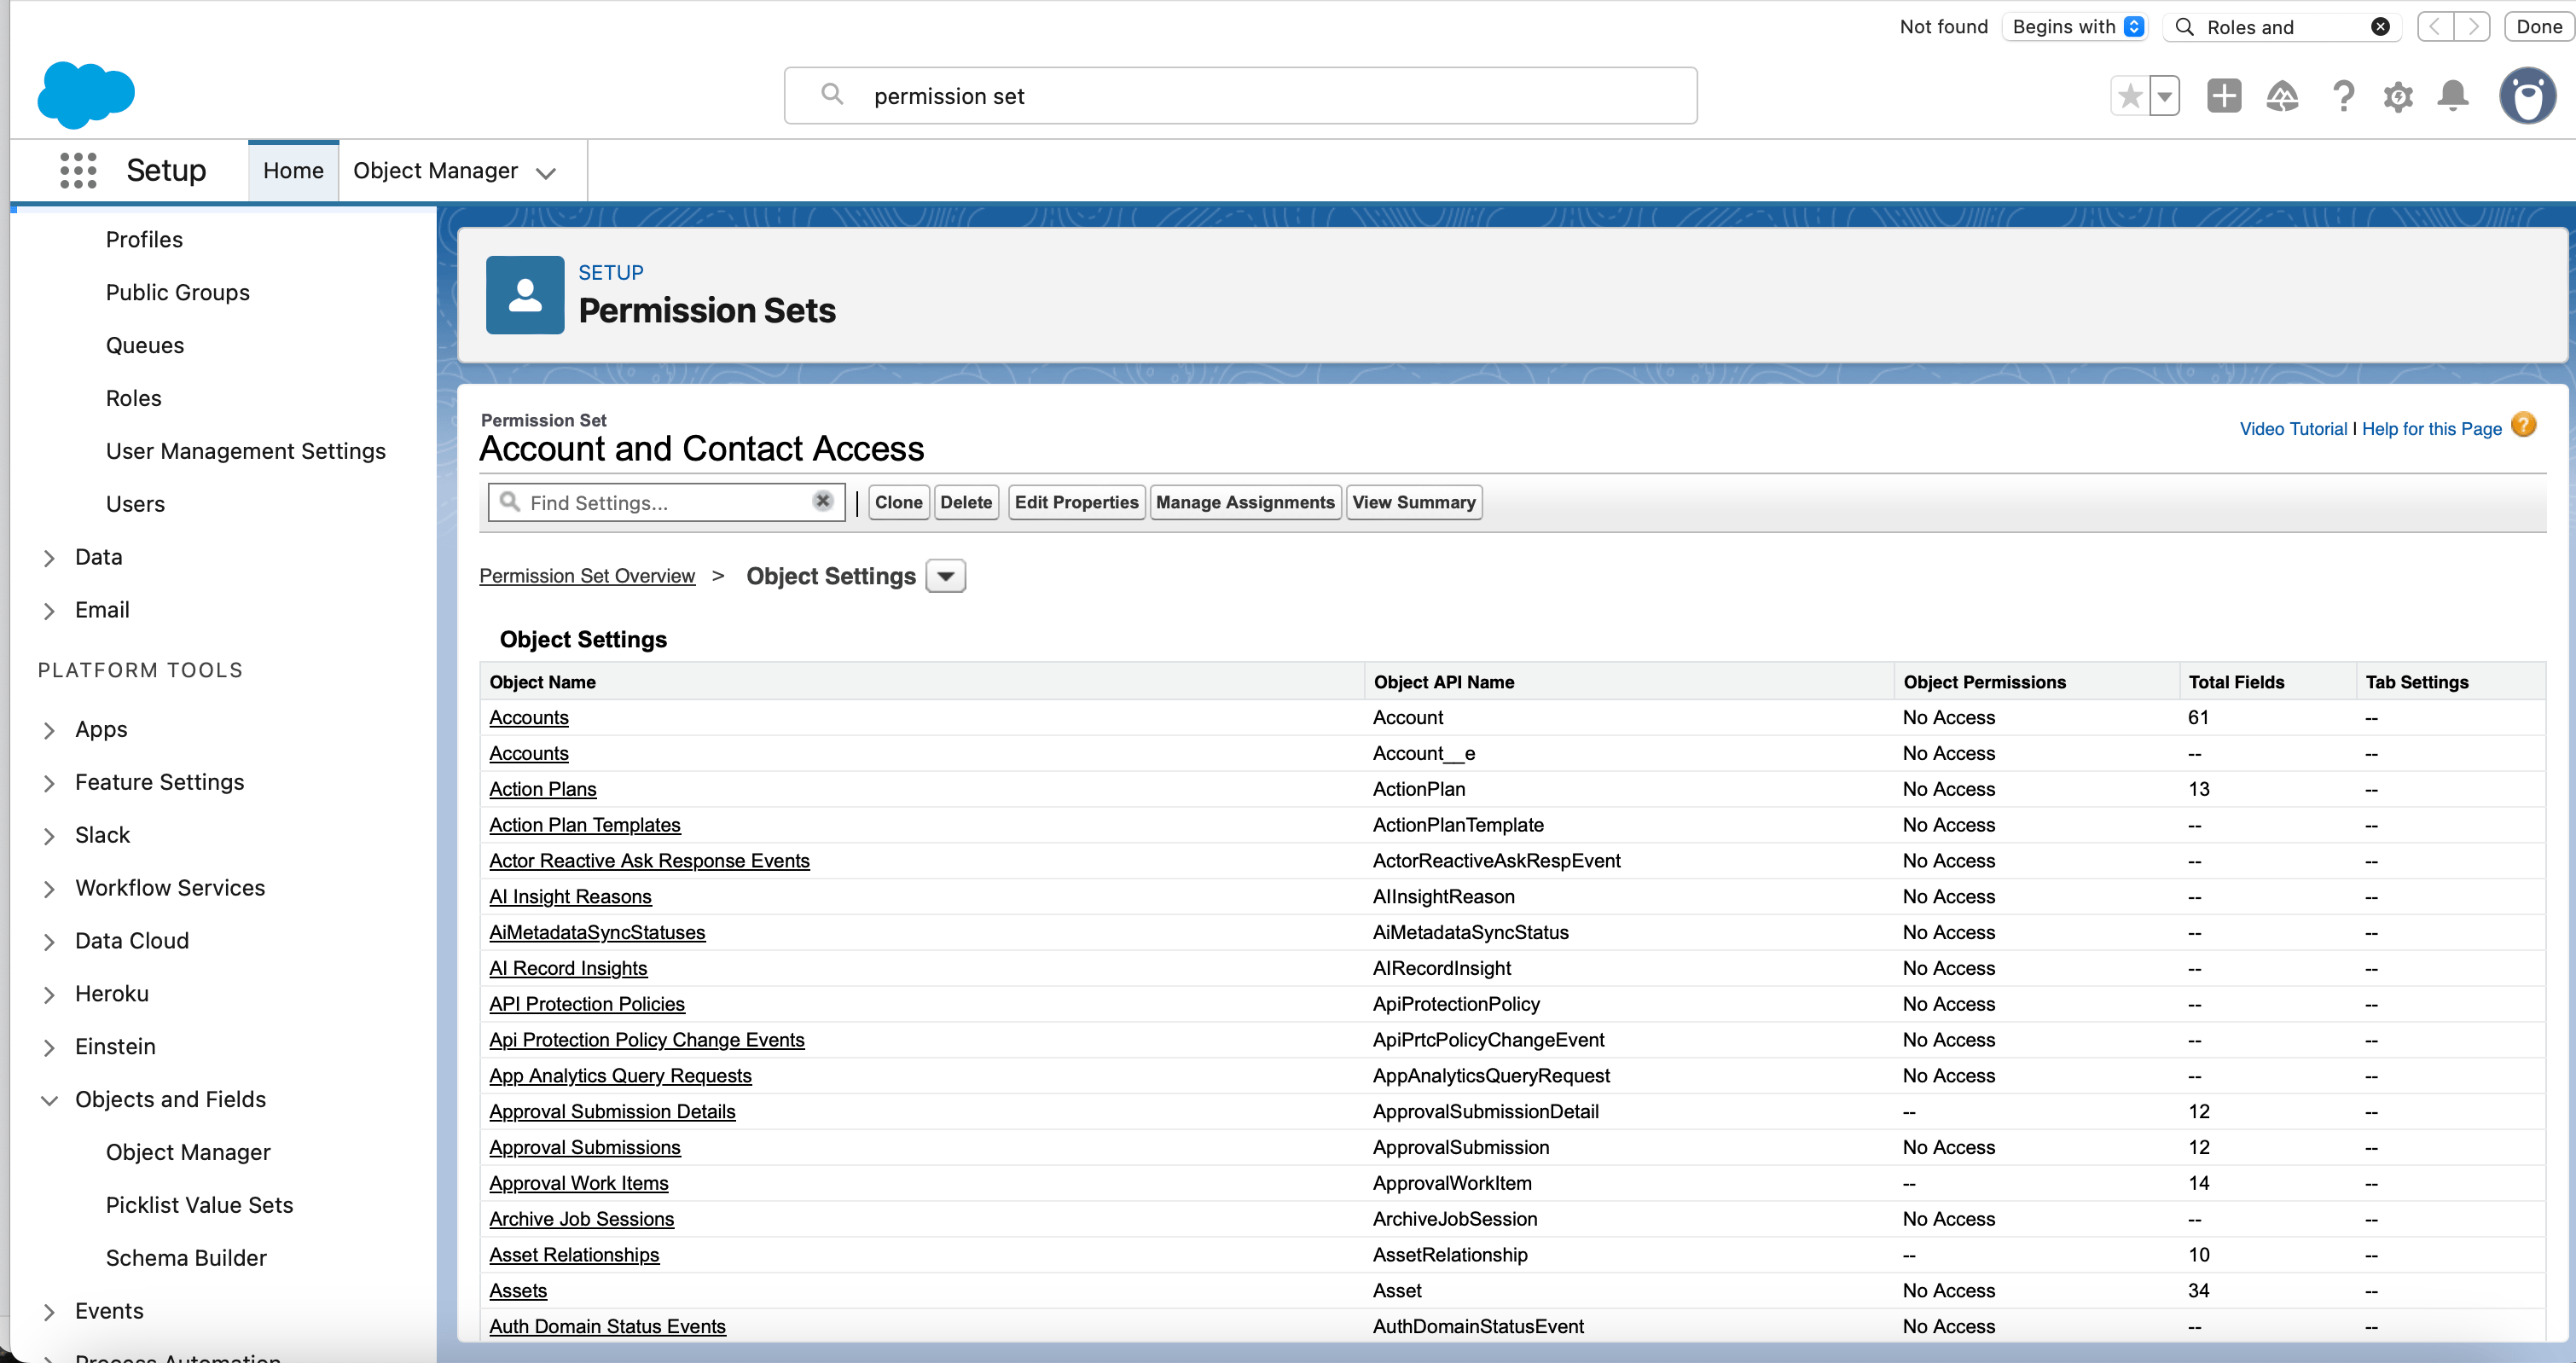 3. Check the relevant boxes under **Object Permissions** and **Field Permissions**, then click **Save**.
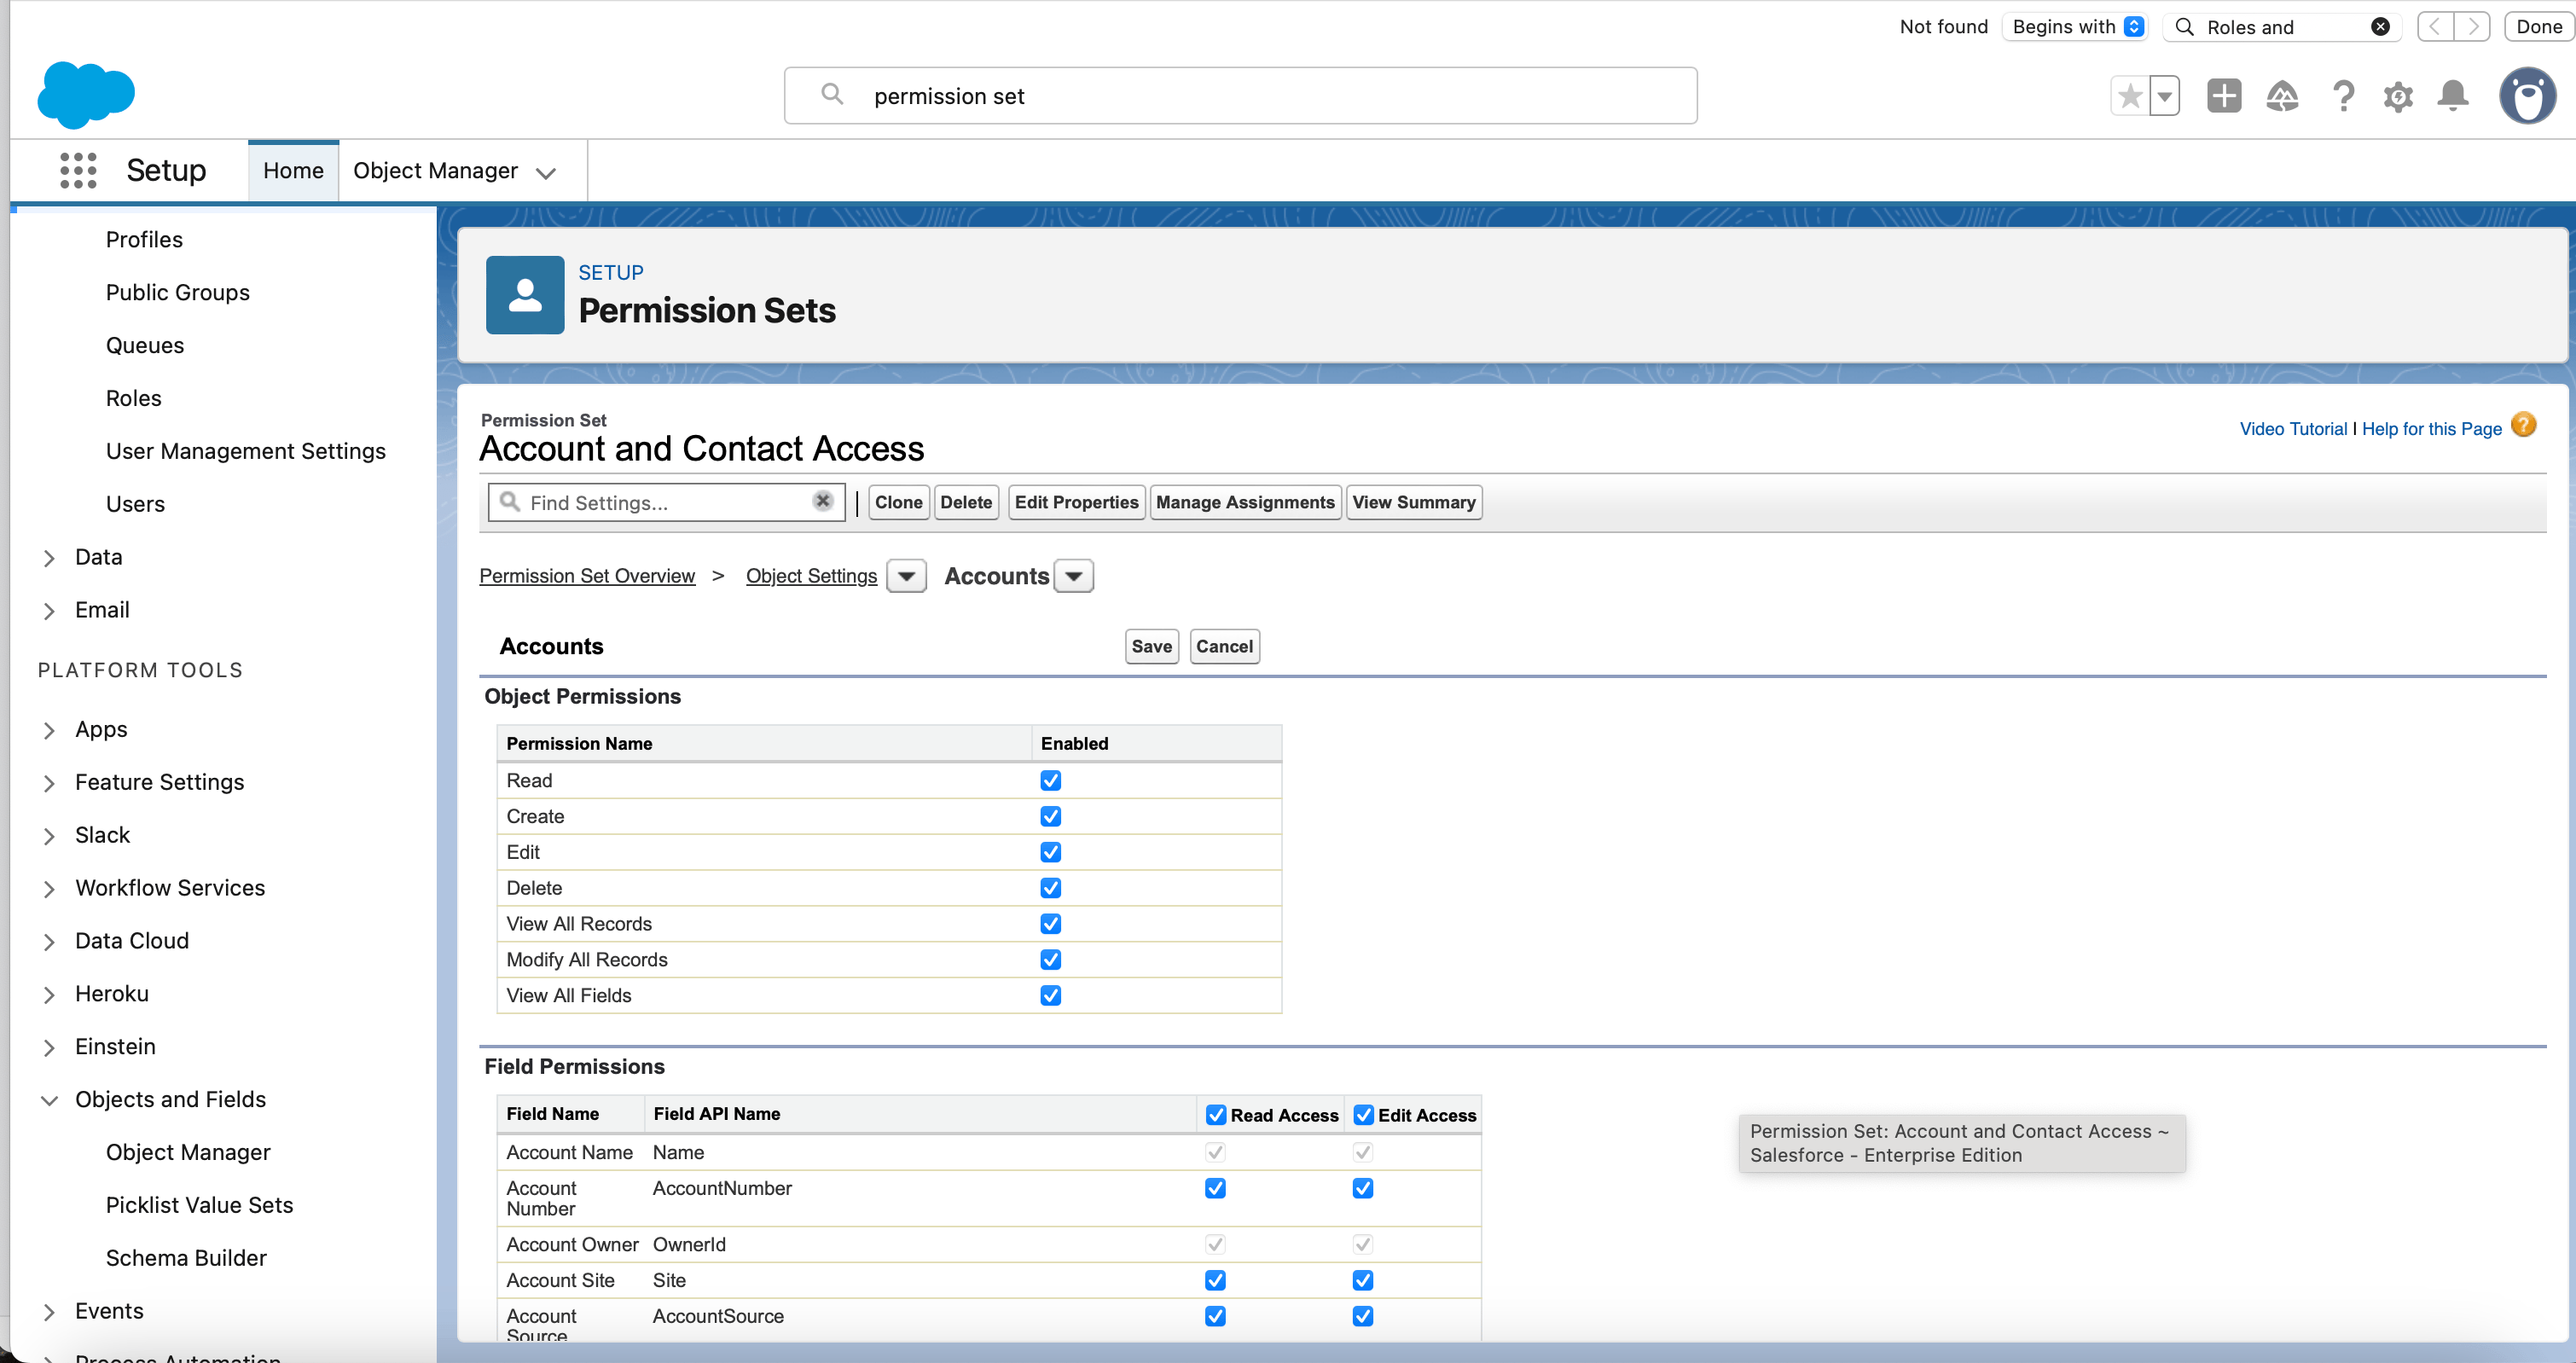 4. Repeat for every object the integration needs to access.
#### 4. Configure system permissions
1. Select **System Permissions**.
4. Repeat for every object the integration needs to access.
#### 4. Configure system permissions
1. Select **System Permissions**.
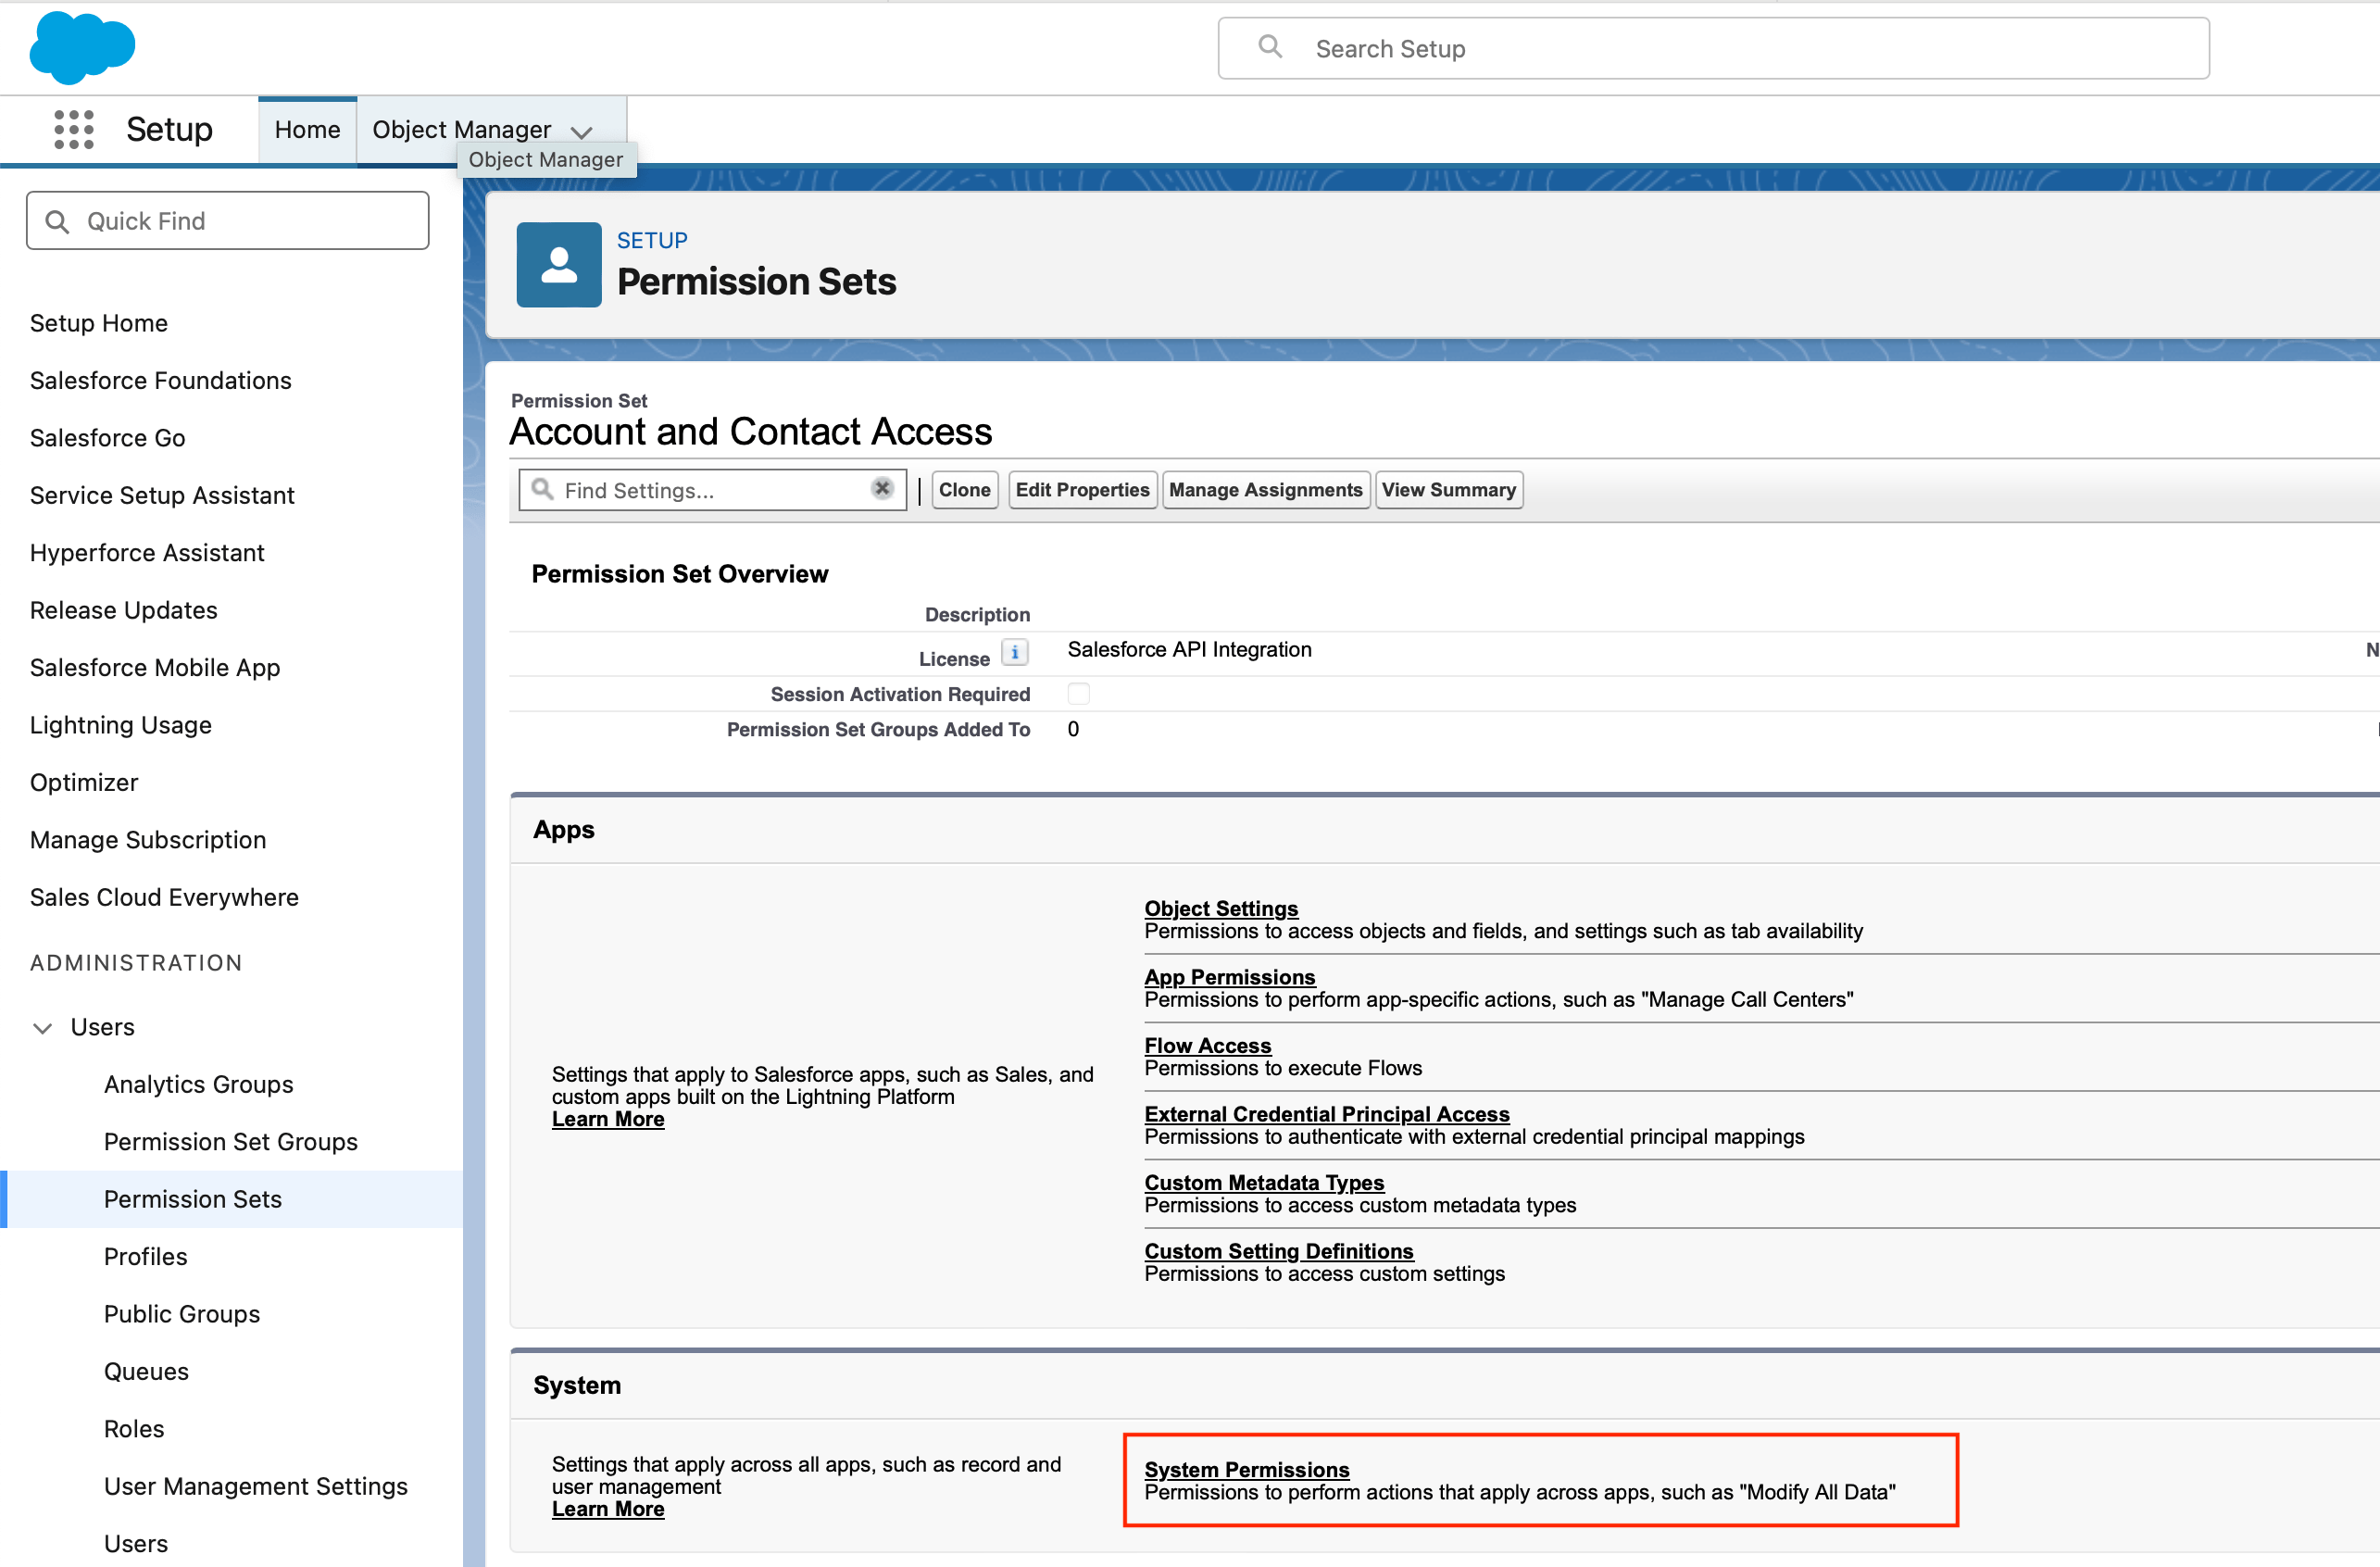 2. Ensure the required system permissions (listed at the start of this section) are selected, then click **Save**.
 #### 5. Assign the permission set to the integration user
1. Click **Manage Assignments**.
#### 5. Assign the permission set to the integration user
1. Click **Manage Assignments**.
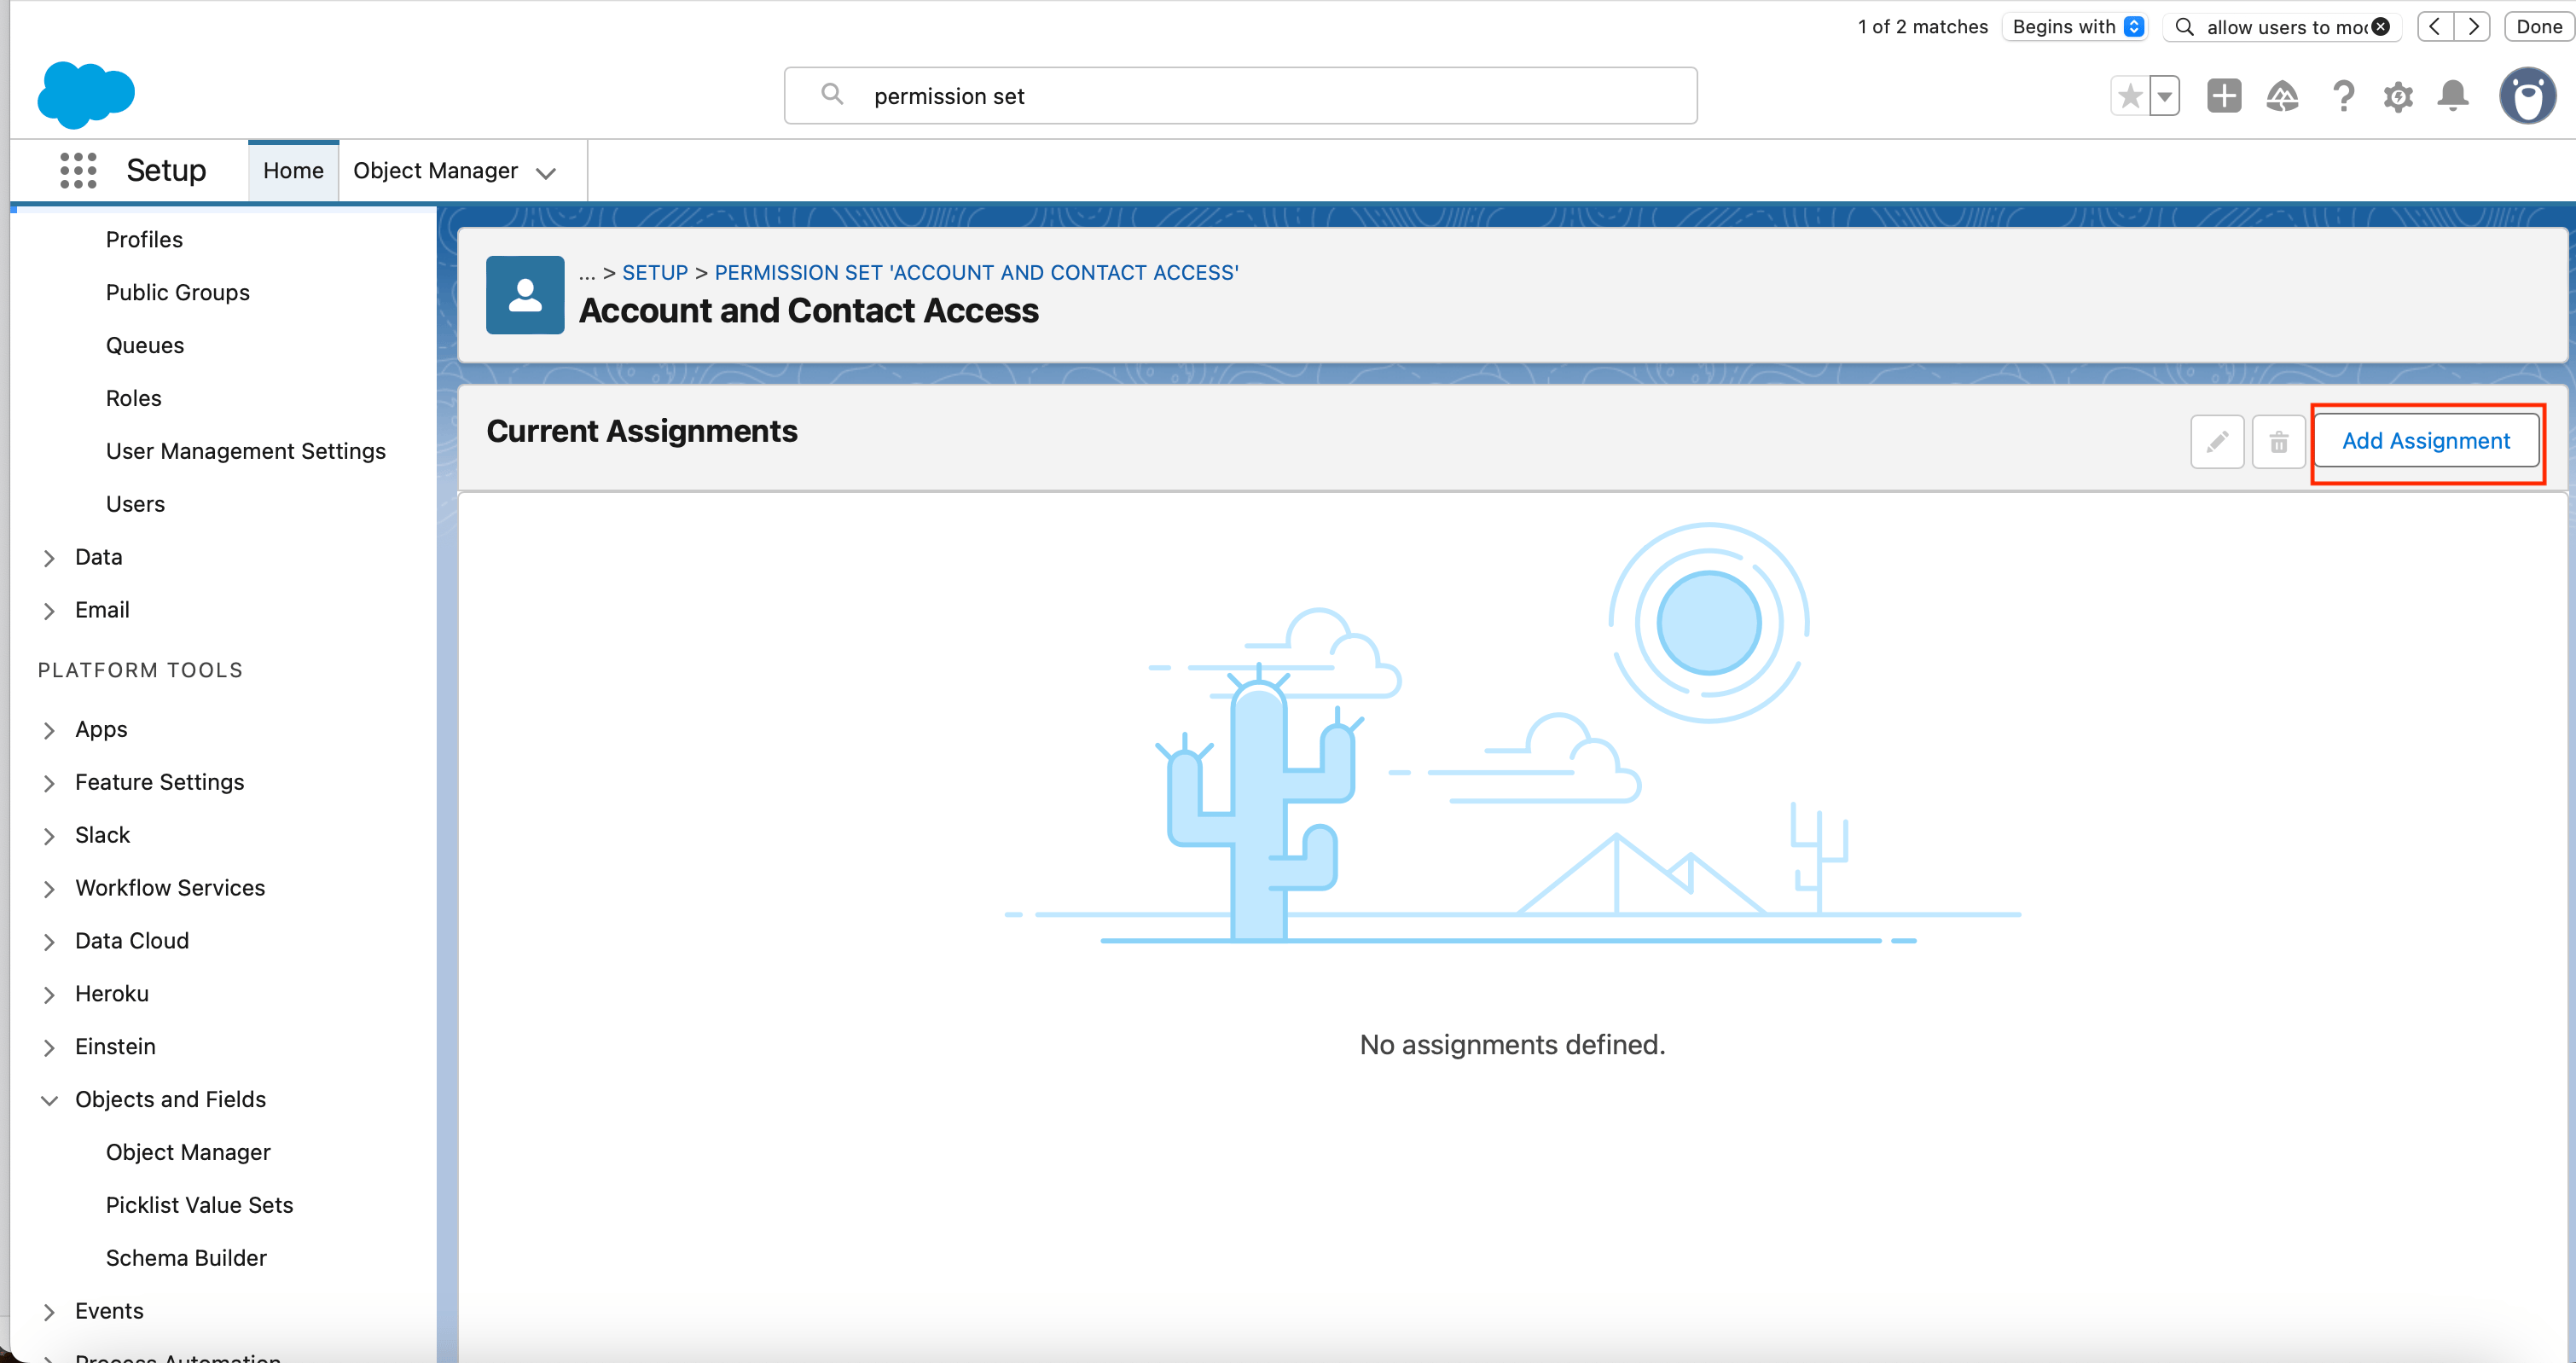
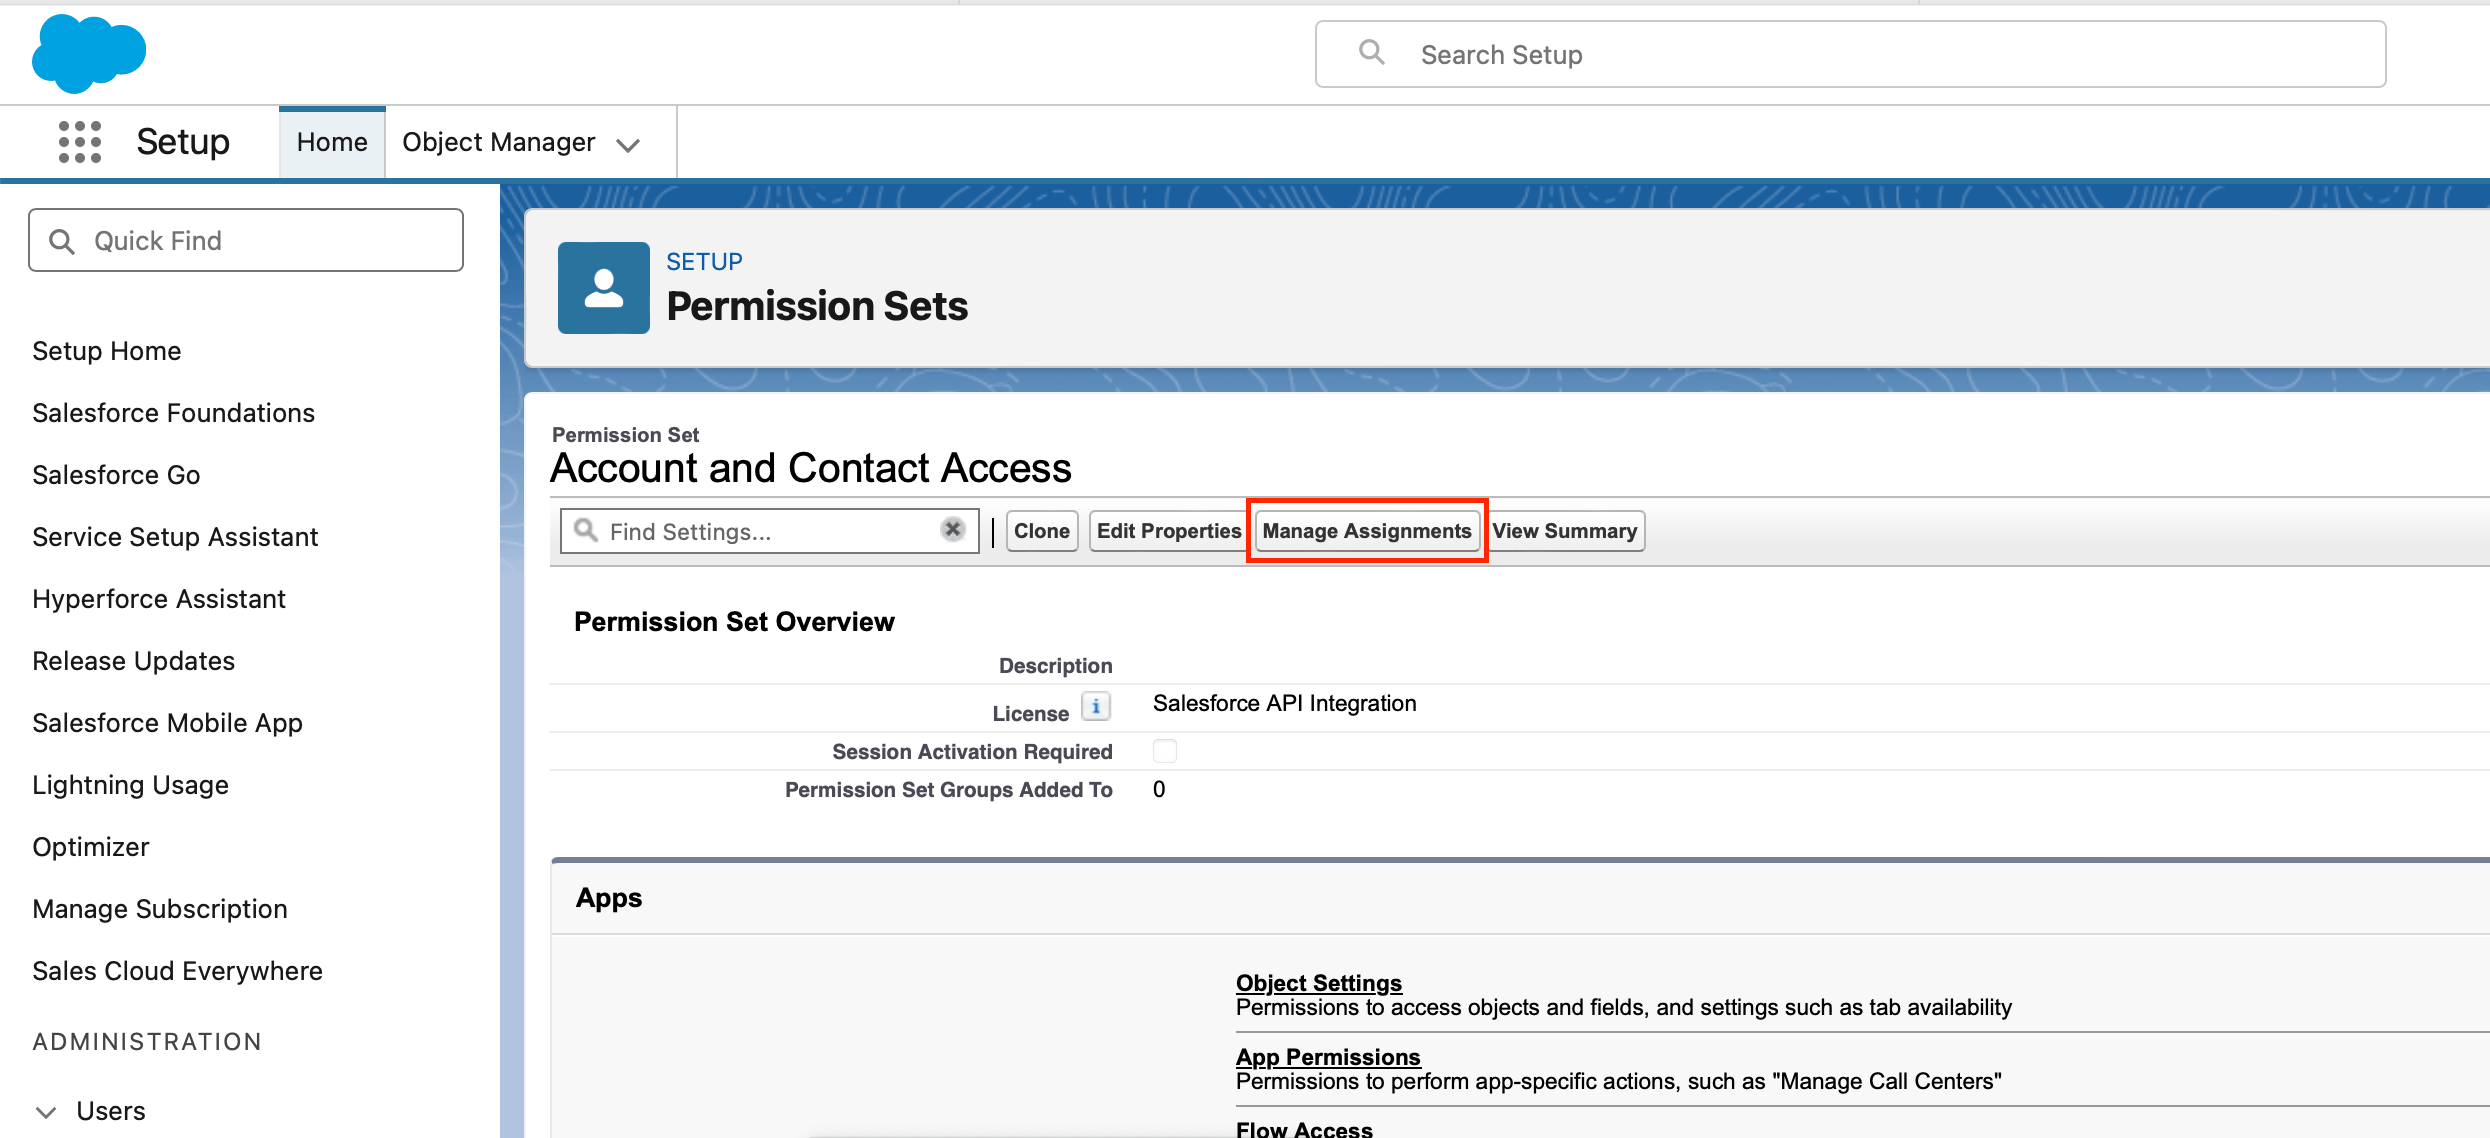 2. Click **Add Assignment**.
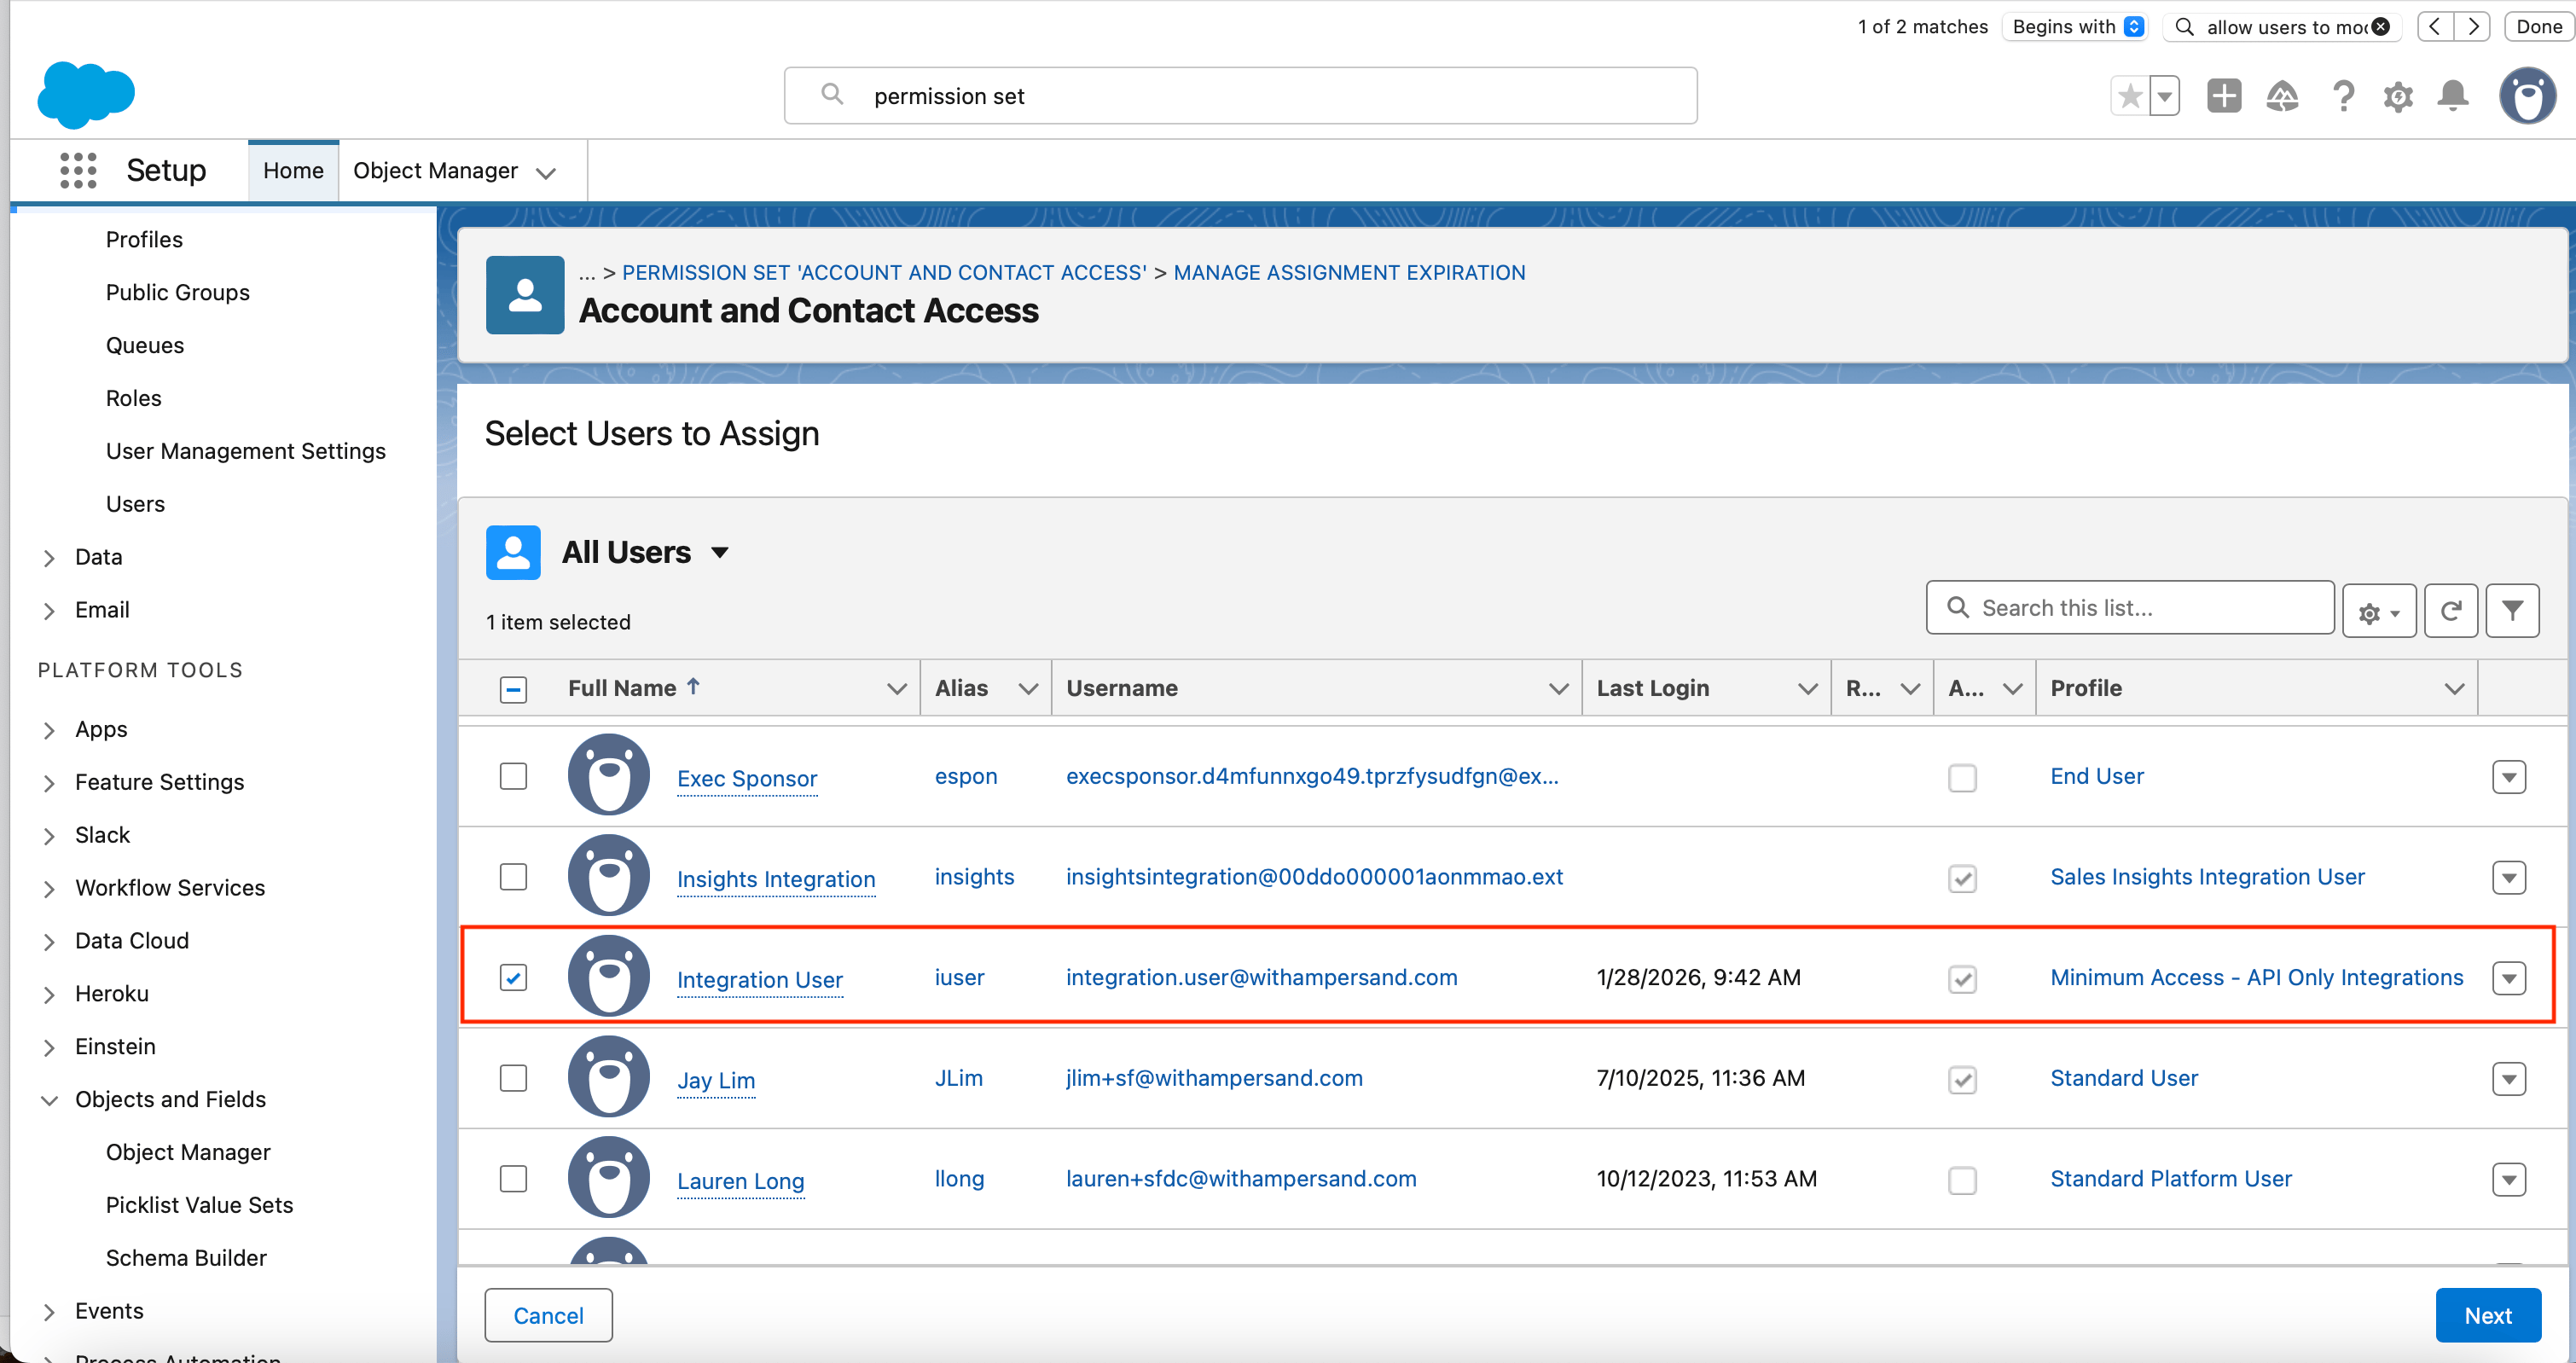
 3. Select the integration user you created in step 1.
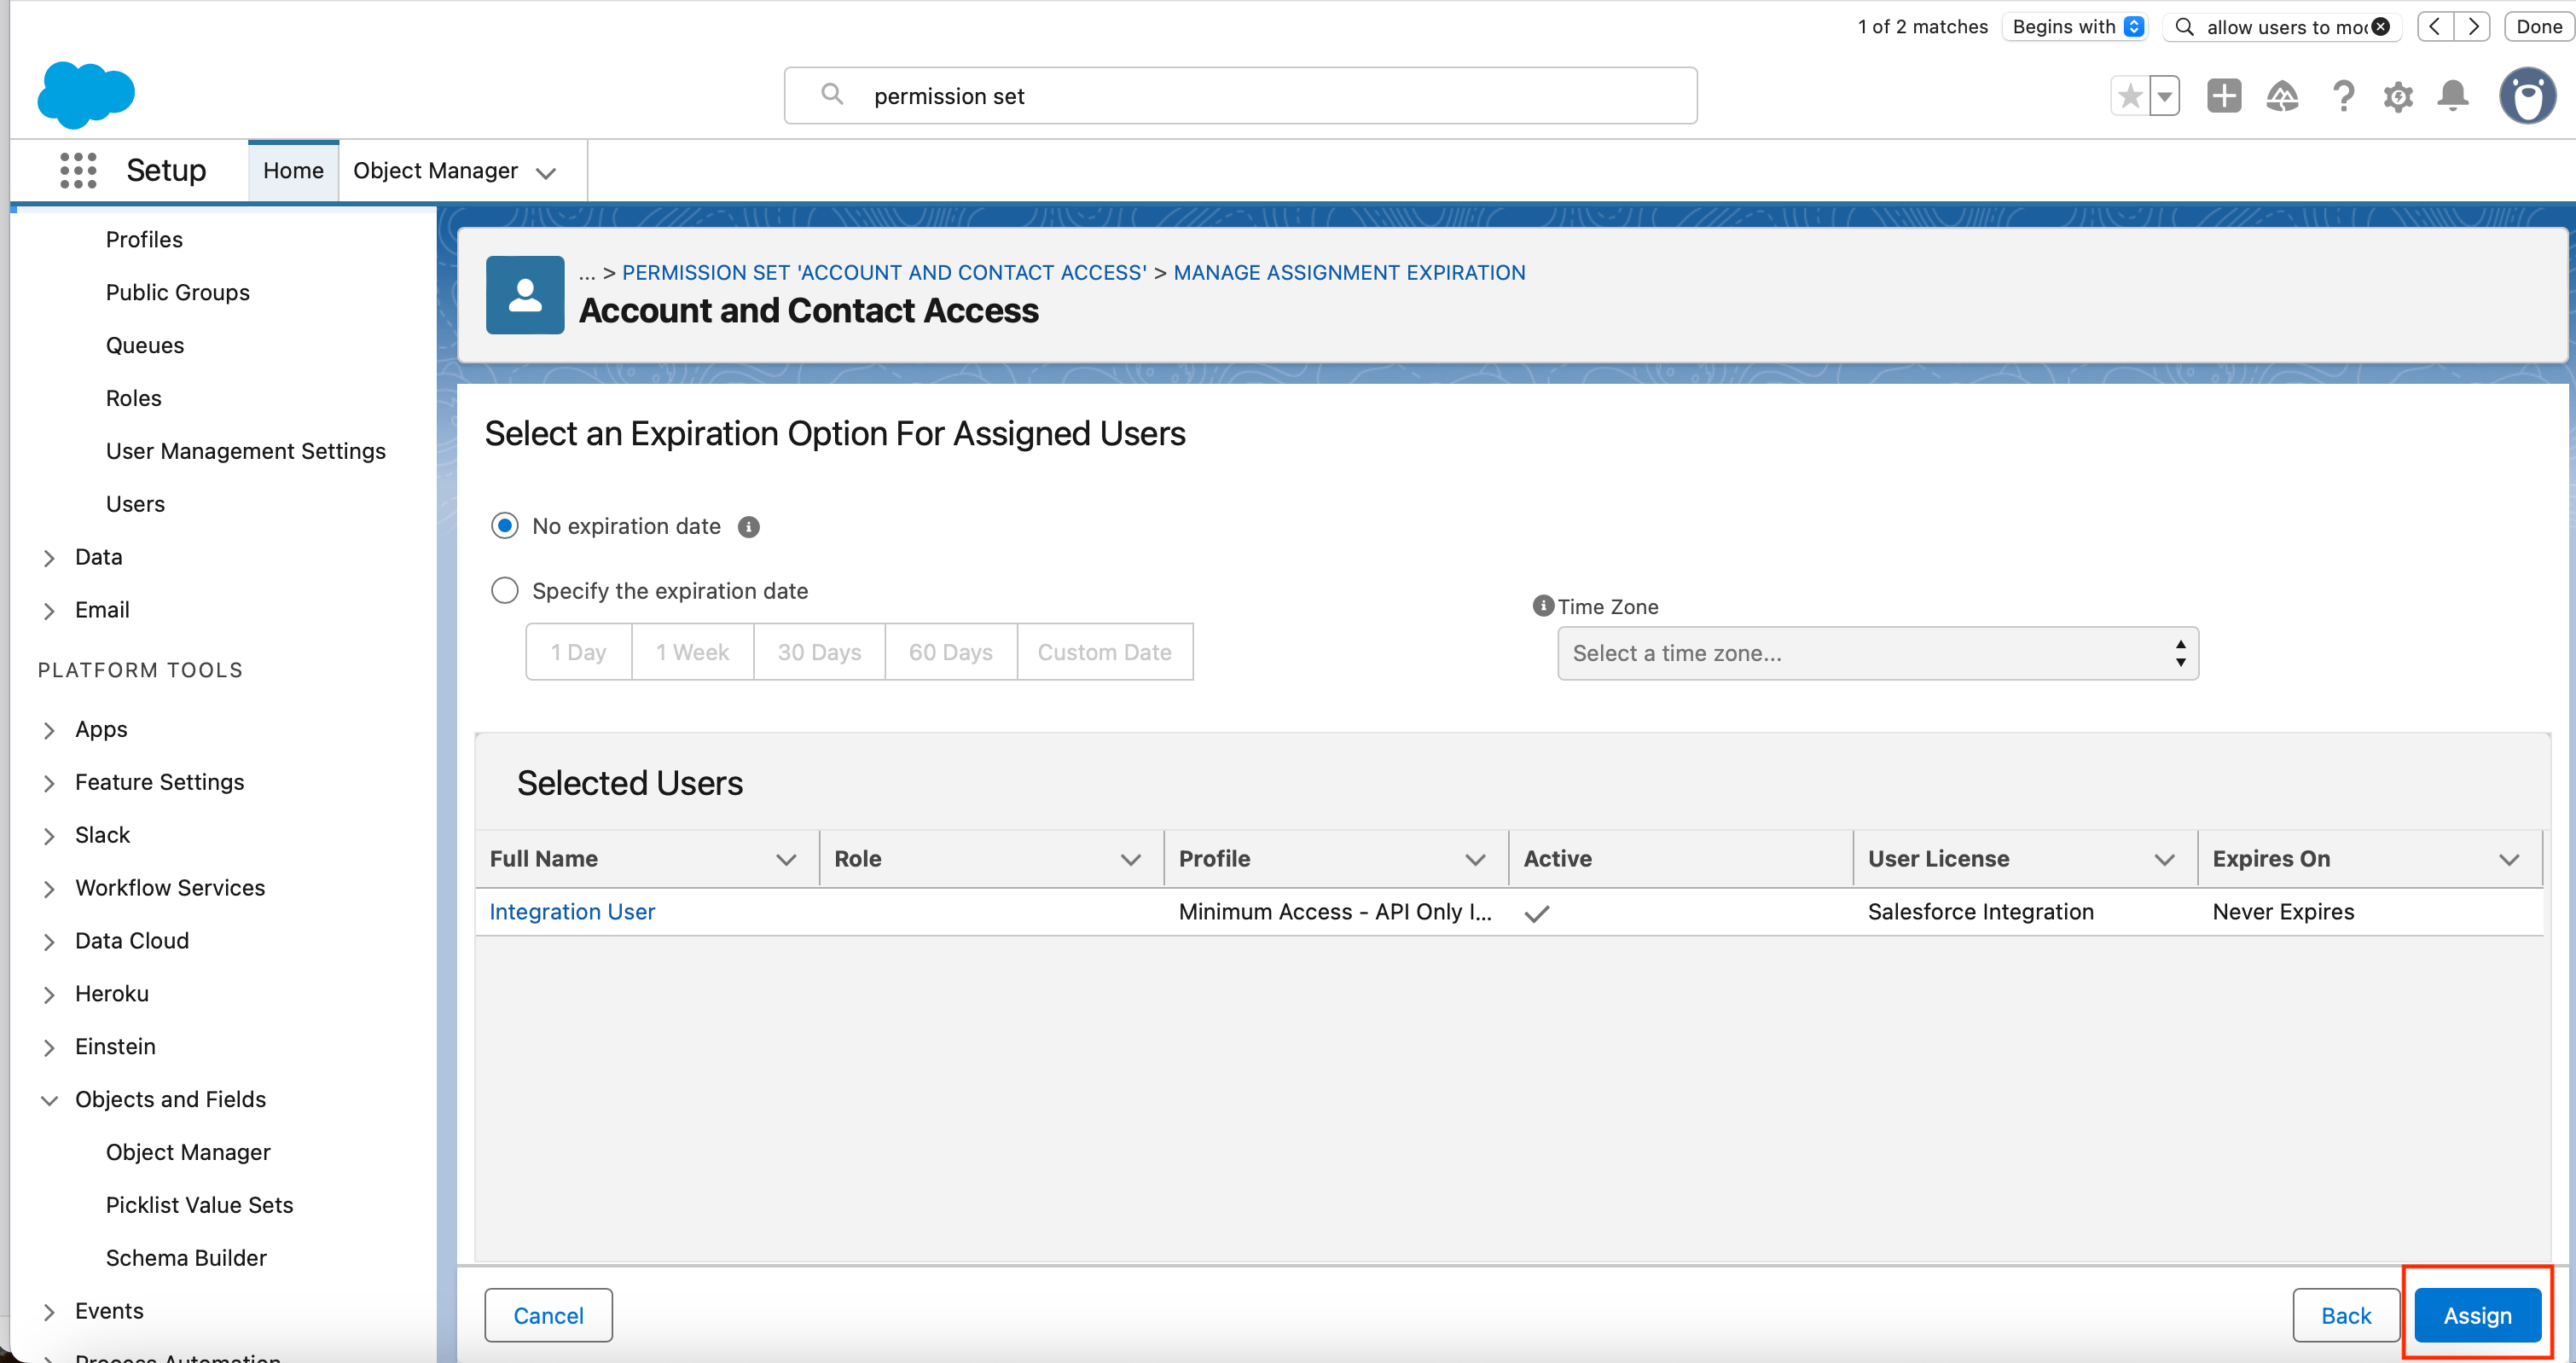
 4. Set **Expires On** to **Never Expires**, then click **Assign**.
 ## After installing the integration
Configure OAuth policies so the integration can maintain a stable connection.
1. Log in to **Salesforce**.
2. Go to **Setup**.
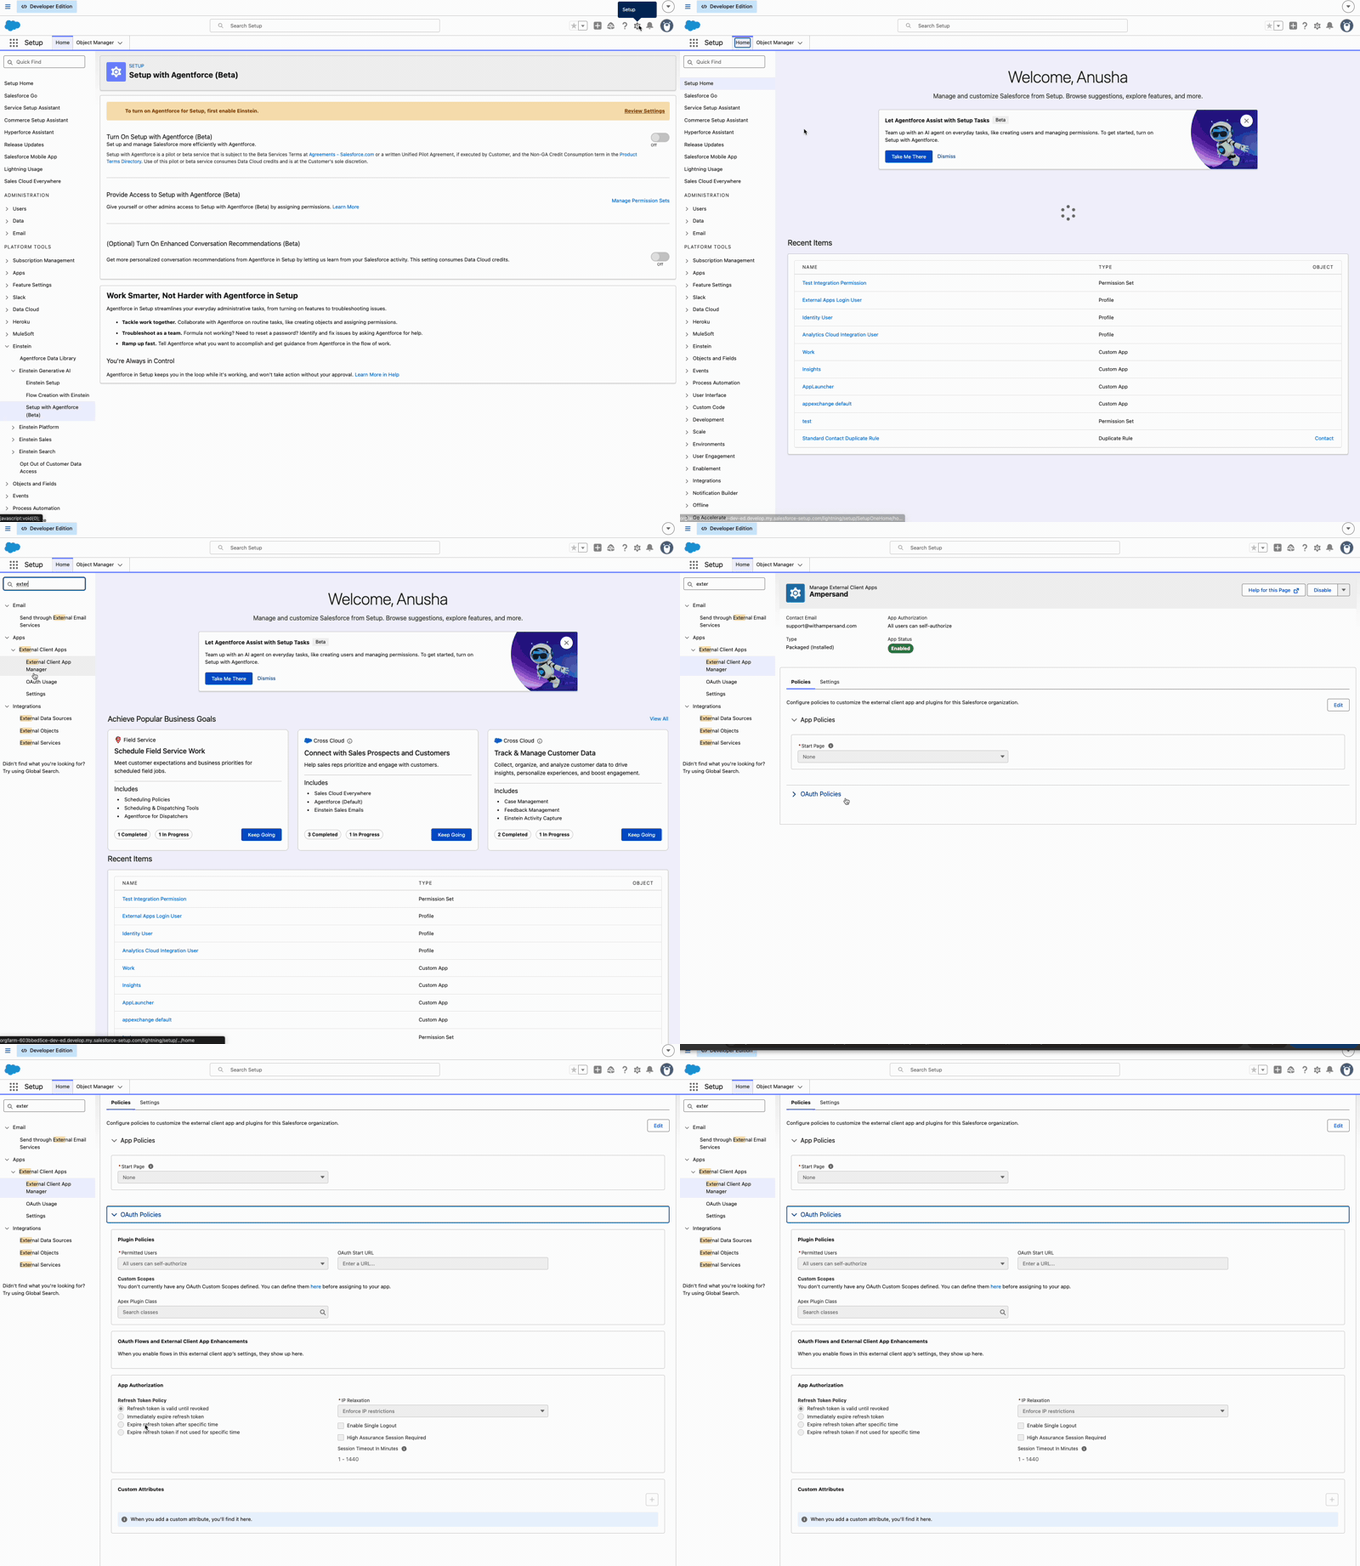
3. In the **Quick Find** box, search for **External Client App Manager**.
4. Click the name of the installed External Client App.
5. Go to the **Policies** tab and click **Edit**.
6. Under **OAuth Policies**, set **Permitted Users** to **All users may self-authorize**.
7. Under **App Authorization**:
* Set **Refresh Token Policy** to **Refresh token is valid until revoked**.
* Set **IP Relaxation** to **Relax IP restrictions**.
8. Click **Save**.
## After installing the integration
Configure OAuth policies so the integration can maintain a stable connection.
1. Log in to **Salesforce**.
2. Go to **Setup**.
3. In the **Quick Find** box, search for **External Client App Manager**.
4. Click the name of the installed External Client App.
5. Go to the **Policies** tab and click **Edit**.
6. Under **OAuth Policies**, set **Permitted Users** to **All users may self-authorize**.
7. Under **App Authorization**:
* Set **Refresh Token Policy** to **Refresh token is valid until revoked**.
* Set **IP Relaxation** to **Relax IP restrictions**.
8. Click **Save**.
 Confirm **Permitted Users** so the right people can authorize the app.
1. Log in to **Salesforce**.
2. Go to **Setup**.
3. In the **Quick Find** box, search for **Connected Apps OAuth Usage**.
4. Find this integration's connected app and click **Manage App Policies**.
5. Under **OAuth Policies**, set **Permitted Users** to one of:
* **Admin approved users are pre-authorized** — only selected users can access.
* **All users may self-authorize** — all users can access the app.
Confirm **Permitted Users** so the right people can authorize the app.
1. Log in to **Salesforce**.
2. Go to **Setup**.
3. In the **Quick Find** box, search for **Connected Apps OAuth Usage**.
4. Find this integration's connected app and click **Manage App Policies**.
5. Under **OAuth Policies**, set **Permitted Users** to one of:
* **Admin approved users are pre-authorized** — only selected users can access.
* **All users may self-authorize** — all users can access the app.
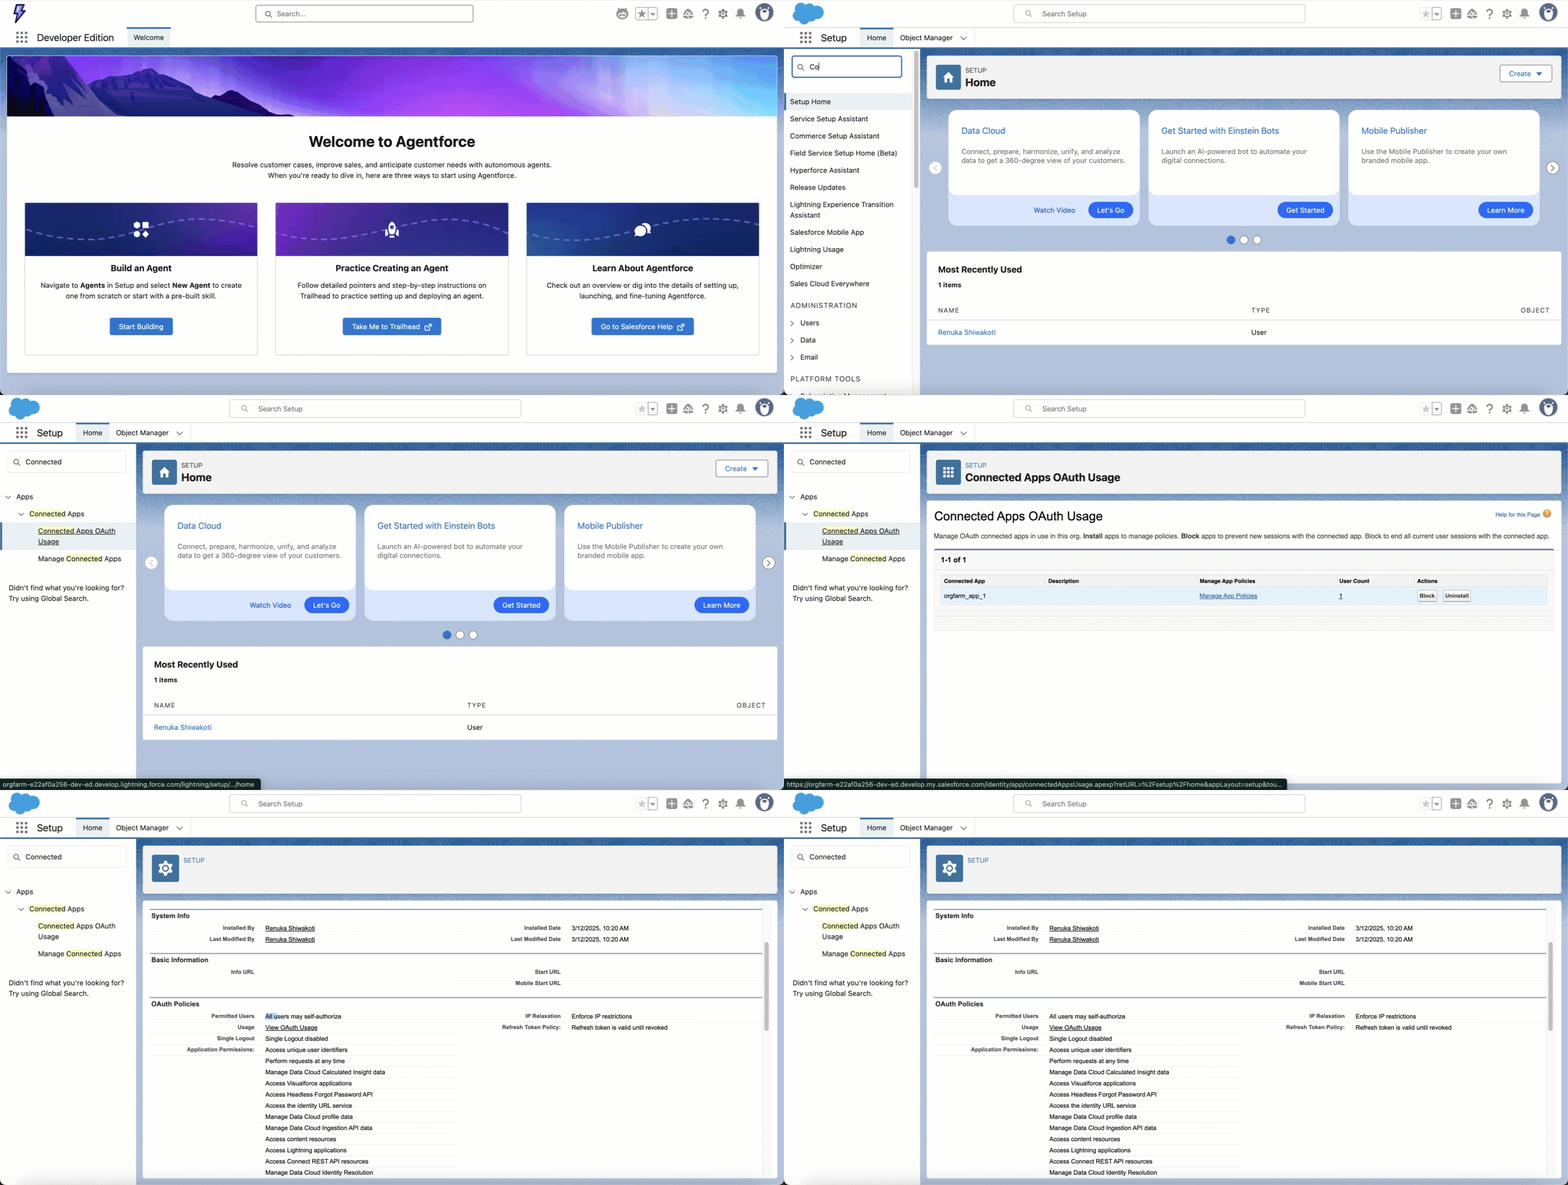 If you need to change these settings:
1. Click **Install** next to your connected app.
2. In **OAuth Usage and Policies**, set the appropriate permissions level.
3. Click **Save**.
## Subscribe Action permissions
If the integration includes Subscribe Actions, enable these permissions.
Explicitly enable:
* **Modify Metadata Through Metadata API Functions** — configure event channels and memberships through Metadata API
* **Customize Application** — configure artifacts like Named Credentials so Ampersand can connect to event channels securely
Salesforce auto-enables these dependent permissions when you enable the ones above:
* **View Setup and Configuration** — access setup configuration to create webhook subscription settings
* **View Roles and Role Hierarchy** — correct visibility context so Salesforce can deliver events (without this, events may be generated but not delivered)
* **Manage Custom Permissions** — create and manage dedicated event channels and channel memberships for the installation
Enable these on the profile (Option A, step 1) or permission set (Option B, step 4) you configured above.
If you need to change these settings:
1. Click **Install** next to your connected app.
2. In **OAuth Usage and Policies**, set the appropriate permissions level.
3. Click **Save**.
## Subscribe Action permissions
If the integration includes Subscribe Actions, enable these permissions.
Explicitly enable:
* **Modify Metadata Through Metadata API Functions** — configure event channels and memberships through Metadata API
* **Customize Application** — configure artifacts like Named Credentials so Ampersand can connect to event channels securely
Salesforce auto-enables these dependent permissions when you enable the ones above:
* **View Setup and Configuration** — access setup configuration to create webhook subscription settings
* **View Roles and Role Hierarchy** — correct visibility context so Salesforce can deliver events (without this, events may be generated but not delivered)
* **Manage Custom Permissions** — create and manage dedicated event channels and channel memberships for the installation
Enable these on the profile (Option A, step 1) or permission set (Option B, step 4) you configured above.